 Orders & Positions Monitor Properties
Orders & Positions Monitor Properties
Orders & Positions Monitor Properties
Preferences dialog for "Orders & Positions Monitor" contains two sections: Look and Columns.
In this part of the Look tab you can change specific colors of the table. Text colors are located on the left and background colors on the right. To change a color you can simply double click on it or click on the  button to choose another one.
 |
For each type of grouped rows you can individually select text and background colors.
Text Color (left) - the text color you can choose by pressing the button located on the right of each color field.
Background (right) - the current background color. You can also change a color by double click on the color field you want to change.
 |
You can individually change the colors of long/short "Fill" and long/short "Position" rows.
Text Color (left) - the text color you can choose by pressing the button located on the right of each color field.
Background (right) - the background color. You can also change a color by double click on the color field you want to change.
 |
Colors of orders that have different proximity can be changed separately.
Text Color (left) - the text color you can choose by pressing the button located on the right of each color field.
Background (right) - the current background color. You can also change a color by double click on the color field you want to change.
 |
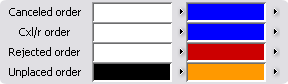
Different colors can be set for different kinds of orders.
Text Color (left) - the text color you can choose by pressing the button located on the right of each color field.
Background (right) - the current background color. You can also change a color by double click on the color field you want to change.
 |
You can change the table grid color.
Text Color (left) - the text color you can choose by pressing the button located on the right of each color field.
Background (right) - the current background color. You can also change a color by double click on the color field you want to change.
Profit/Loss can also be changed at will.
Positive Color (left) - the text color you can choose by pressing the button located on the right of each color field.
Negative Color (right) - the current background color. You can also change a color by double click on the color field you want to change.
 |
In this part of the Look tab you can modify different settings regarding the way Orders and Position Monitor will display information.
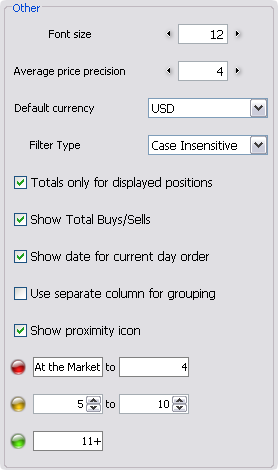 |
Choose the "Font size" of the text displayed in the table by clicking on the small arrow buttons at the left and right of the font size field.
The "Average price precision" can be changed with simple clicks on the left and right arrow buttons. To decrease the value click  , to increase click .
Change the "Default currency" by selecting any currency in the combo box.
Change the "Filter type" by selecting any type of filter in the combo box.
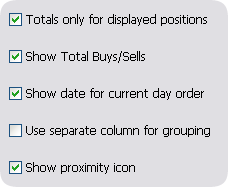
"Totals only for displyed positions" - enable/disable totals for displayed positions.
"Show Total Buys/Sells" - enable/disable capability to show total Buys/Sells.
"Show date for current day order" - enable/disable capability to show date for current day order.
"Use separate column for grouping" - enable/disable usage of separate columns for grouping.
"Show proximity icon" - enable/disable capability to show proximity icons.
 |
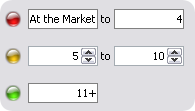
Proximity settings of orders can be changed. You can define three types of proximities to have a better overview over orders.
 |

From "Columns" you can choose what columns you want to see in the table. In this section, there are two lists: "Available" and "Displayed".
From "Right Click Menu" you can choose menu items that will appear in the popup triggered by a right click. The popup shows the "Displayed" menu items only if their action is supported by the selected row/rows;
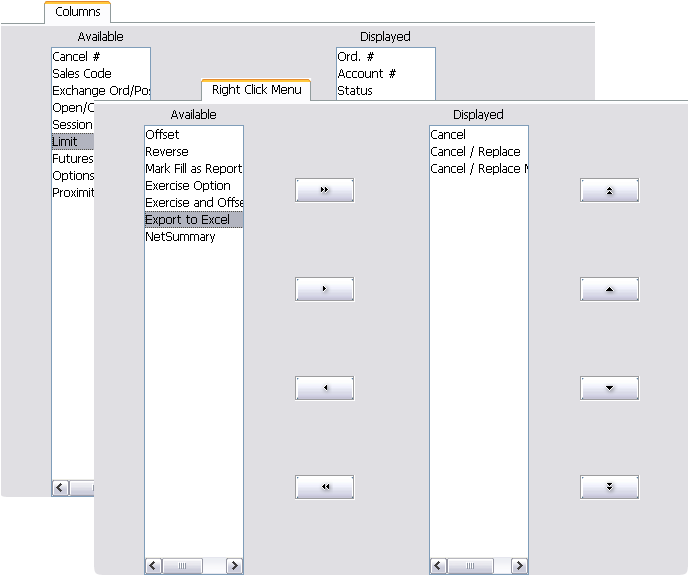 |
In the first section, "Available", are the available columns. Items that are located in the "Available" section will not appear in the table.
In the other section, "Displayed", are all the columns that will appear in the table. To add a column select the column name from the list of available columns and press
button.
The column name will be moved from the list of available items to the list of displayed items. To remove a column: select the column name from the list of displayed items and press
button.
The column name will be moved from the list of displayed items to the list of available items. To add all the columns in the list of displayed items press
 button.
To remove all the columns from the list of displayed items press  button.
In the first section, "Available", are the available popup menu items. Items that are located in the "Available" section will not appear as menu items in the popup menu.
In the other section, "Displayed", are all items that will appear in the popup menu if their actions are supported by the selected row/rows.
To add a menu item: select the menu item name from the list of available menu items and press button.
The menu item name will be moved from the list of available items to the list of displayed items. To remove a menu item: select the menu item name from the list of displayed items and press button.
The menu item name will be moved from the list of displayed items to the list of available items. To add all the menu items in the list of displayed items press button.
To remove all the menu items from the list of displayed items press button.
"Apply" button - this will change the previous setting with the actual settings
"Apply to All" button - this will change the previous setting with the actual settings for all existing frames of this kind
"Default for New" button - the settings will be set as default for new frames
"Cancel" button - the changes will be ignored