|
Contingent Orders are orders that are placed automatically by the GUI, based on triggering events.
The triggering events will be fills, partial fills and price changes. All Contingent Order functionality
is controlled by a provisioning setting "Contingent Orders". Contingent orders are activated
for the period the application is running; if logged-off, the contingent orders are saved on the server
and next time the user logs-in they are reactivated.
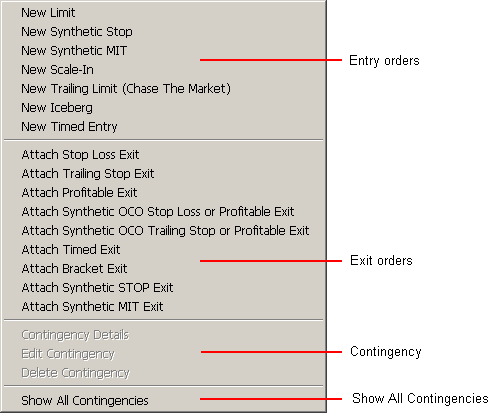
The "Contingency" menu contains four sections:
After these sections, there are 2 more items described:
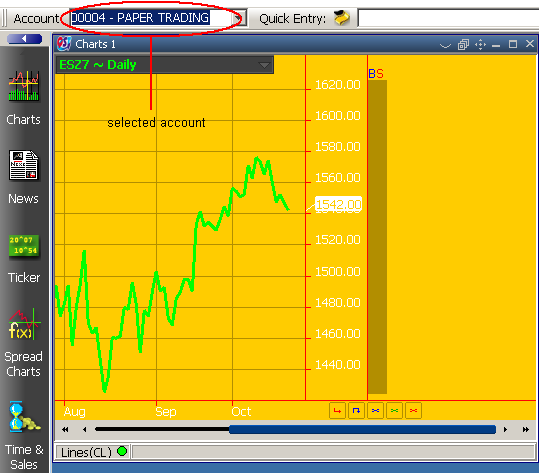
The "Contingency" menu appears in all the frames which
have Order Entry column when the user right clicks this section
(see the figure below). In the following, the example figures,
will be from the "Charts"
frame of the application, although Order Entry column exists in
a lot of frames. For example, in "Depth Of Market", "Price
Ladder", "Advanced Options", "Orders & Positions",
"Options Chain", "Quotes Monitor" or "Broker
Workstation" too.
|
There are two types of contingent orders: "Entry Orders" and "Exit Orders".
This type of contingent order can be placed simple or it can be attached to a placed order ("Buy" or
"Sell").
|
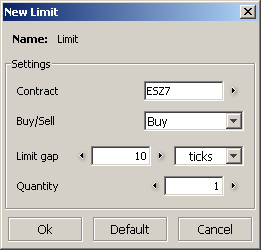
1. Limit
It's the standard limit order. In the example at the
right there is a limit order: Buy 1 ESZ7 at 10 ticks below the market will
be placed. The "Limit gap" is the number of the ticks
between the market price and the contingency and it can be specified in
ticks, points, $ or %.
In the "New Limit" dialog box, the user can specify the "Contract", if he
wants to "Buy" or "Sell", the "Limit gap"
and the "Quantity".
By pressing the "Ok" button, the user validates his
selections. By pressing the "Default" button, he
makes the new settings to be default in the following. By
the "Cancel" button, he interrupts this action and goes
back to the initial frame, without any contingent order placed.
|
|
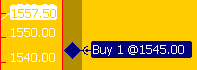
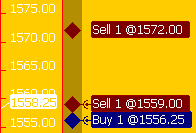
An example for a "New Limit" contingency order (Buy 1
@1545.00) which is placed in
the Order Entry section of the "Charts" frame is
represented in the first figure below. Two "New Limit"
contingency orders (Sell 1 @1559.00 and Buy 1 @1556.25) are
attached to a placed order (Sell 1 @1572.00) in the
second figure.
|
|

|
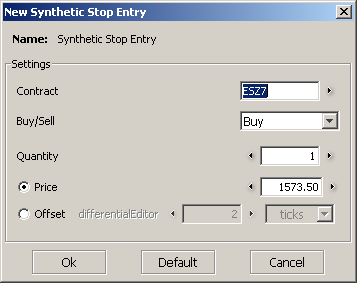
2. Synthetic Stop Entry
Simulates a STOP order type. It can be used when the user needs to place a STOP order and the exchange does not support STOP orders. For "Buy" STOP orders, the order
becomes a market order once there is a trade >= the STOP price.
For "Sell" STOP orders, the order becomes a market order once there is a
trade <= the STOP price.
In this dialog box the user selects the "Contract",
the order type ("Buy" or "Sell") and the "Quantity"
for this contingent order. After these he can set the "Price"
or the "Offset" to specify the conditions for placing an
order. The "Offset" is the number of the ticks between
the market price and the contingency.
By pressing the "Ok" button, the user validates his
selections. By pressing the "Default" button, he causes the new settings to be the default settings in the future. By
using the "Cancel" button, he interrupts this action and goes
back to the initial frame, without any contingent order being placed.
|
|
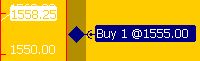
An example for a "New Synthetic Stop Entry" contingency order
(Buy 1 @1555.00) which is placed in
the Order Entry section of the "Charts" frame is represented
in the first figure below.
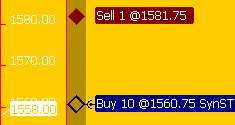
The second example represents a "New Synthetic Stop Entry"
contingency order (Buy 10 @1560.75 SynSTOP) which is
attached to a placed order (Sell 1 @1581.75).
|
|
|
3. Synthetic MIT (Market If Touched) Entry
Simulates an MIT order. It can be used when the user needs to place a MIT order and the exchange does not support MIT orders. For "Buy" MIT orders, when Last
trade price <= price, fill the order at the Last trade price. For "Sell" MIT orders, when Last trade price >=
price, fill the order at the Last trade price.
In this dialog box the user selects the "Contract",
the order type ("Buy" or "Sell") and the "Quantity"
for this contingenct order. After these he can set the "Price"
or the "Offset" to specify the conditions for placing an
order. The "Offset" is the number of the ticks between
the last trade price and the contingency.
By pressing the "Ok" button, the user validates his
selections. By pressing the "Default" button, he
causes the new settings to be the default settings in the future. By
using the "Cancel" button, he interrupts this action and goes
back to the initial frame, without any contingent order being placed.
|

|
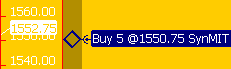
An example for a "New Synthetic MIT Entry" contingency order
(Buy 5 @1550.75 SynMIT) which is placed in
the Order Entry section of the "Charts" frame is represented
in the first figure below.
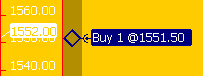
The second example represents a "New Synthetic MIT Entry"
contingency order (Buy 3 @1551.50 SynMIT) which is
attached to a placed order (Sell 1 @1531.25 STOP).
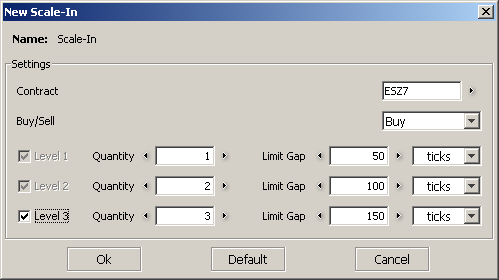
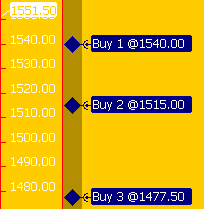
4. Scale-In
A Scale-In is 2 or 3 separate limit orders, with progressively lower (for buys)
or higher (for sells) limit prices. The user can set a different quantity per level.
The "Limit gap" represents the number of the ticks between
the market price and the contingency and it can be specified in
ticks, points, $ or %.
By pressing the "Ok" button, the user validates his
selections. By pressing the "Default" button, he
makes the new settings to be default in the following. By
the "Cancel" button, he interrupts this action and goes
back to the initial frame, without any contingent order placed.
An example for a "New Scale-In" contingency order
(Buy 1 @1540.00, Buy 2 @1515.00 and Buy 3 @1477.50) which is placed in
the Order Entry section of the "Charts" frame is represented
in the first figure below.
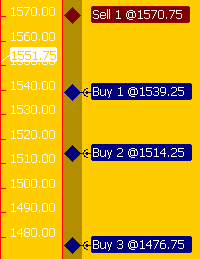
The second example represents a "New Scale-In"
contingency order (Buy 1 @1539.25, Buy 2 @1514.25 and Buy 3 @1476.75) which is
attached to a placed order (Sell 1 @1570.75).
|
|
|
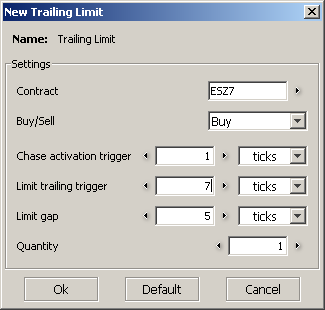
5. Trailing Limit (Chase The Market)
Think of it as the opposite of the Trailing Stop.
Activation can be a differential value or MIT. For example, a user places such an order to buy
1 @ 12 with a differential of 3 ticks, and the market is 15. The market moves to 16, so
the order is canceled and replaced to buy 1 @ 13. Next, the market goes down to 14. Nothing happens. Next, it goes
up to 17, and at that time, the order is canceled and replaced to buy 1 @ 14.
Instead of a "Stop Gap" we use a "Limit Gap"
(see Trailing Stop description below).
In the dialog box at the right the user can specify the "Contract"
and the type of the order ("Buy" or "Sell"). After
these, he sets the "Chase activation trigger". This
element is an initial condition. If the number of the ticks
between the market price and the contingency equals the number
specified in this field, in the following, "Limit trailing
trigger" and "Limit gap" options will be used. "Limit
trailing trigger" and "Limit gap" show how many ticks
are between the market price and the contingent order. The first
shows the distance, which determinate the cancel of the order
and the second the distance where it will be replaced. The
distance can be specified in ticks, points, $
or %. The last option, which can be set is the "Quantity"
of the order.
By pressing the "Ok" button, the user validates his
selections. By pressing the "Default" button, he
makes the new settings to be default in the following. By
the "Cancel" button, he interrupts this action and goes
back to the initial frame, without any contingent order placed.
|
|
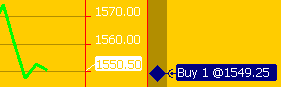
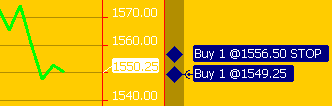
An example for a "New Trailing Limit" contingency order
(Buy 1 @1549.25) which is placed in
the Order Entry section of the "Charts" frame is represented
in the first figure below.
The second example represents a "New Trailing Limit"
contingency order (Buy 1 @1549.25) which is
attached to a placed order (Buy 1 @1556.50 STOP).
|
|
|
6. Iceberg
Defines a cascade of orders. It has a total quantity as an overall quantity to be traded for the contract.
The user specifies a step and an "Initial quantity" both used to compute the quantity for the orders
to be placed. An order is placed on the initial quantity. When the initial order is filled, immediately
place an order for the lesser of ("Incremental quantity") or ("Total
quantity" - quantity already filled).
For example: given the "Total quantity" of 10, the "Incremental
quantity" of 2 and the "Initial quantity" of 4,
the following sequence of quantities are generated: 4, 2, 2, 2. So, 4 orders are created using these quantities:
first one placed immediately and the next 3 as unplaced.
Second example: given the "Total quantity" of
10, the "Incremental quantity" of 3 and the "Initial quantity"
of 2, the following sequence of quantities are generated: 2, 3,
3, 2. The last element is 2, because 2+3+3=8 and 10-8=2,
although the "Incremental quantity" is 3 you have just 2
at the end of the sequence.
All orders are placed at the same price. The user can Cancel/Replace/Cancel Replace MKT and the price or
quantities for the active order and left unplaced orders are recomputed. |

|
The user sets the type of the orders (Buy/Sell), the total quantity, the initial quantity, the incremental
quantity and the price for the orders (an absolute price or an offset).
The total quantity and the incremental can be modified using the "Edit Contingency Window"
accessed from the menu.
After these he can set the "Price" or the "Offset" to specify the
conditions for placing an order. The "Offset" is the number of the ticks between the last trade
price and the contingency.
By pressing the "Ok" button, the user validates his selections. By pressing the
"Default" button, he causes the new settings to be the default settings in the future. By
using the "Cancel" button, he interrupts this action and goes
back to the initial frame, without any contingent order being placed.
An example for a "New Iceberg" contingency order
(Buy 10 @1550.00) which is placed in
the Order Entry section of the "Charts" frame is represented
in the first figure below.
The second example represents a "New Iceberg"
contingency order (Buy 10 @1538.75) which is
attached to a placed order (Sell 1 @1561.25).
|
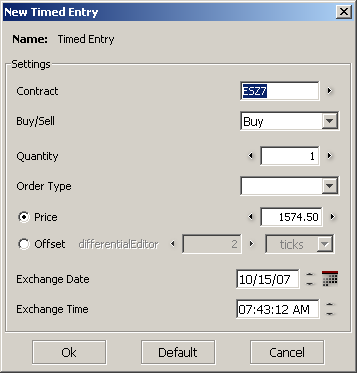
7. Timed Entry
Places a "Sell" or "Buy" order for the specified
"Contract", "Quantity", "Order Type"
and "Price" at the date and time which are indicated by the
"Exchange Date"
and the "Exchange Time" fields. The "Offset" is the number of the ticks between
the last trade price and the contingency. The date can be selected
by pressing the "Calendar" button  . .
By pressing the "Ok" button, the user validates his
selections. By pressing the "Default" button, he causes
the new settings to be the default settings in the future. By using the "Cancel"
button, he interrupts this action and goes back to the initial
frame, without any contingent order being placed.
|
|
An example for a "New Timed Entry" contingency order (Buy 1 @1551.50)
which is placed in the Order Entry section of the "Charts" frame is
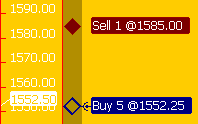
represented in the first figure below. The second example represents a "New
Timed Entry" contingency order (Buy 5 @1552.25) which is attached to
a placed order (Sell 1 @1585.00).
This type of contingent order can be attached to a placed order ("Buy"
or "Sell").
|
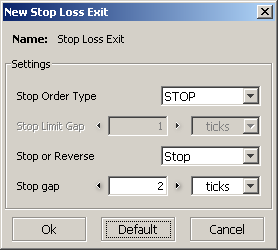
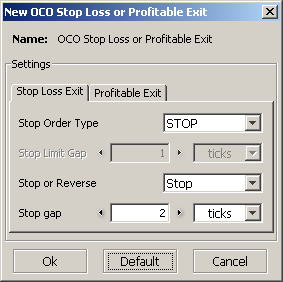
1. Stop Loss Exit
|
The "Stop Order Type" can be STOP,
STL or STWL. For STWL type
the user can set the "Stop Limit Gap" which
is the number of the ticks between the market price
and the contingency.
a) Stop: The standard STOP, STL or
STWL order.
b) Reverse Stop: Stop (STOP, STL or STWL) order
with Entry Position quantity * 2 that effectively changes the user's
position from long to short or short to long.
By pressing the "Ok" button, the user
validates his selections. By pressing the "Default"
button, he makes the new settings to be default in
the following. By the "Cancel" button, he
interrupts this action and goes back to the initial
frame, without any contingent order placed.
|
|
|
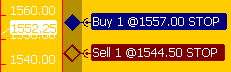
An example for a "Stop Loss Exit" contingent order (Sell
1 @1544.50 STOP)
which is attached to a placed order (Buy 1 @1557.00 STOP) is
represented in the figure at the right.
|
|
|
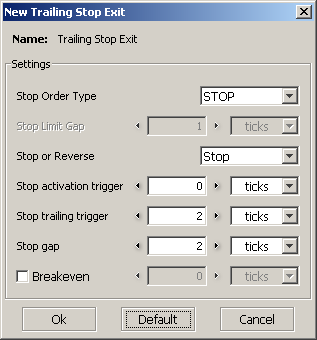
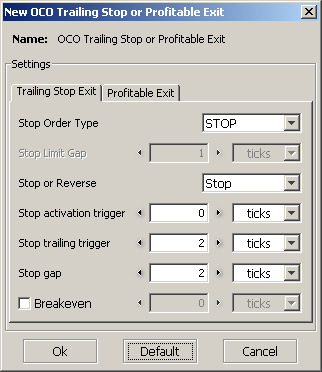
2. Trailing Stop Exit
There are three important parameters in the "New Trailing
Stop Exit" dialog box: "Stop activation trigger",
"Stop trailing trigger" and "Stop gap".
Stop activation trigger:
The activation differential is the differential between the fill price and the last
trade that must be reached before the trailing stop is activated. This is the
"profit" that a trade must reach, so for a long position, Last Trade - Fill
Price >= Activation and for a short position, Fill Price - Last Trade >= Activation.
If zero is specified, then the initial stop order should be placed at the same time
as the limit order.
Stop gap: The differential between the last trade and the stop
price when a trailing stop is initialized or adjusted.
Stop trailing trigger (Adjust Interval): Stop Trailing Trigger can be minimum 1 tick and it represents the number of ticks for the market to move in trader's favor, so a new adjustment will be made. |
|
|
|
The Stop gap of a trailing stop can be set to "Breakeven" which is the
position entry price plus a user-definable value representing additional commissions and
fees that the user must recover for the trade to be considered
"breakeven". Once a stop is set to breakeven, it no longer adjusts. A user
should not set a stop gap to Breakeven of the Stop activation
trigger is zero. This is because the
Entry and Exit would be triggered at the same time. Therefore, in order to specify a
Stop gap
of Breakeven, the Stop activation trigger should be > 0. Breakeven is often used in conjunction with multiple
adjustment levels. For example, a trader might set the first adjustment level of a trailing
stop at 0, 3, 1. In this way, when filled, he will lose a maximum of 3 ticks. However, he
is concerned that once the trade becomes profitable, small downswing before a rebound could
take him out of the market. Therefore, he sets a second adjustment level of the trailing stop
at 4, Breakeven, 0. Therefore, when his profit reaches 4, his Stop is adjusted to his
Breakeven price, and it stays there until he exits the position.
By pressing the "Ok" button, the user validates his selections. By
pressing the "Default" button, he makes the new settings to be
default in the following. By the "Cancel" button, he interrupts this
action and goes back to the initial frame, without any contingent order placed.
|
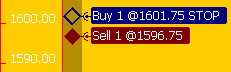
An example for a "Trailing Stop Exit" contingent order (Buy
1 @1601.75 STOP)
which is attached to a placed order (Sell 1 @1596.75 is
represented in the figure at the right.
|
|
|
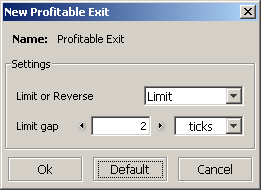
3. Profitable Exit
a) Limit: The standard limit order.
b) Reverse Limit: Limit order with Entry Position quantity * 2 that effectively
changes the user�s position from long to short or short to long.
|
The user can specify the "Limit gap" too, which is the
number of the ticks between the market price and the
contingency. This distance can be specified in points,
$ and %, too.
By pressing the "Ok" button, the user validates his selections. By
pressing the "Default" button, he makes the new settings to be
default in the following. By the "Cancel" button, he interrupts this
action and goes back to the initial frame, without any contingent order placed.
|
|
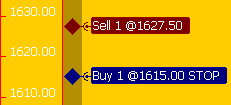
An example for a "Profitable Exit" contingent order (Buy 1
@1615.00 STOP) which is attached to a placed order (Sell 1 @1627.50
is represented in the figure at the right.
|
|
|
4. Synthetic OCO Stop Loss or Profitable Exit
This type of contingent order is a combination between two
contingencies: "Stop Loss Exit" and "Profitable Exit".
These were explained above. OCO (One Cancel Other) means, that
if one of them is placed, the second contingent order will be
canceled. The order which has all the conditions reached, will
be placed first.
By pressing the "Ok" button, the user validates his selections. By
pressing the "Default" button, he makes the new settings to be
default in the following. By the "Cancel" button, he interrupts this
action and goes back to the initial frame, without any contingent order placed.
|
|
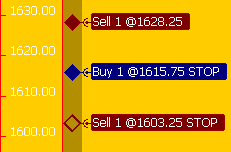
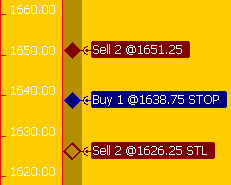
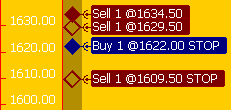
An example for a "New OCO Stop Loss or Profitable Exit" contingency order (Sell 1 @1628.25
and Sell 1 @1603.25 STOP)
which is attached to a placed order (Buy 1 @1615.75 STOP) is represented
in the first figure. In the second figure is represented a "New OCO Stop
Loss or Profitable Exit" contingent order (Sell 2 @1651.25 and Sell 2
@1626.25 STL) which is attached to a placed order (Buy 1 @1638.75 STOP). In
this example the "Stop or Reverse" field has the "Reverse Stop"
value and the "Limit or Reverse", the "Reverse Limit" value.
This is the reason, why the quantity in the second figure for the contingent
order is 2.
|
|
|
5. Synthetic OCO (One Cancel Other) Trailing Stop or Profitable Exit
This type of contingent order is a combination between two
contingencies: "Trailing Stop Exit" and "Profitable Exit".
These were explained above. OCO (One Cancel Other) means, that
if one of them is placed, the second contingent order will be
canceled. The order which has all the conditions reached, will
be placed first.
By pressing the "Ok" button, the user validates his selections. By
pressing the "Default" button, he makes the new settings to be
default in the following. By the "Cancel" button, he interrupts this
action and goes back to the initial frame, without any contingent order placed.
|
|
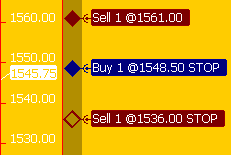
An example for a "New OCO Trailing Stop or Profitable Exit" contingency order (Sell 1 @1561.00
and Sell 1 @1536.00 STOP)
which is attached to a placed order (Buy 1 @1548.50 STOP) is represented
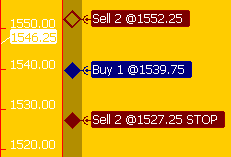
in the first figure. In the second figure is represented a "New OCO
Trailing Stop or Profitable Exit" contingent order (Sell 2 @1552.25 and Sell 2
@1527.25 STOP) which is attached to a placed order (Buy 1 @1539.75). In
this example the "Stop or Reverse" field has the "Reverse Stop"
value and the "Limit or Reverse", the "Reverse Limit" value.
This is the reason, why the quantity in the second figure for the contingent
order is 2.
|
|
|
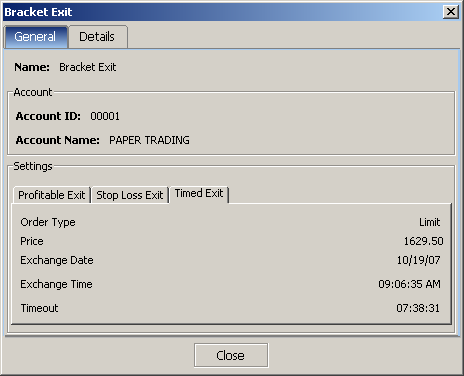
6. Timed Exit
Market or Limit order at the specified time. The user can set
the "Order Type", the "Price" or the "Offset"
which specifies the number of the ticks between the market price
and the contingency and, at last, the "Exchange Date" and
the "Exchange Time" which are the date and the time when
the specified order will be placed. The user can select the date
from a calendar. The calendar can be accessed by pressing the Calendar
button .
By pressing the "Ok" button, the user validates his selections. By
pressing the "Default" button, he makes the new settings to be
default in the following. By the "Cancel" button, he interrupts this
action and goes back to the initial frame, without any contingent order placed.
|

|
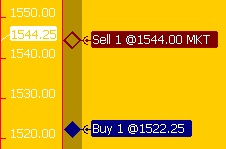
An example for a "New Timed Exit" contingent order (Sell 1
@1544.00 MKT) which is attached to a placed order (Buy 1 @1522.25
is represented in the figure at the right. |
|
|
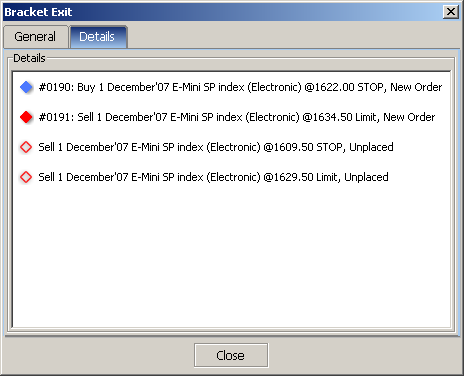
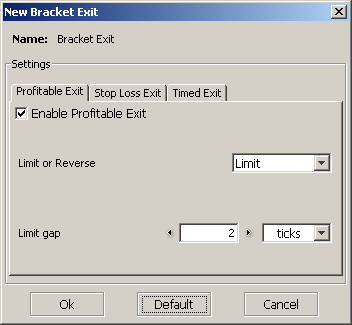
7. Bracket Exit
This type of contingent order is a combination between three
contingencies: "Profitable Exit", "Stop Loss Exit"
and "Timed Exit".
These were explained above. OCO (One Cancel Other) means, that
if one of them is placed, the second and the third contingent order will be
canceled. The order which has all the conditions reached, will
be placed first.
By pressing the "Ok" button, the user validates his selections. By
pressing the "Default" button, he makes the new settings to be
default in the following. By the "Cancel" button, he interrupts this
action and goes back to the initial frame, without any contingent order placed.
|
|
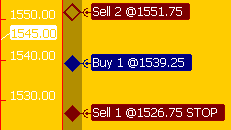
An example for a "New Bracket Exit" contingent order (Sell 2
@1551.75 and Sell 1 @1526.75 STOP) which is attached to a placed order (Buy 1 @1539.25
is represented in the figure at the right.
|
|
|
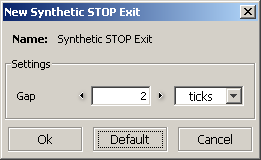
8. Synthetic Stop Exit
This type of exit contingent order is the pair of the "Synthetic
Stop Entry" entry contingent order. The difference between
them is that an entry contingency can be placed alone and can be
attached to a placed order, too and the exit contingency can
just be attached to a placed order.
The user can specify the "Gap" which is the distance
between the market price and the contingency. The distance can
be specified in: ticks, points, $ and %.
By pressing the "Ok" button, the user validates his selections. By
pressing the "Default" button, he makes the new settings to be
default in the following. By the "Cancel" button, he interrupts this
action and goes back to the initial frame, without any contingent order placed.
|
|
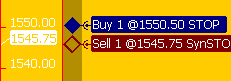
An example for a "New Synthetic Stop Exit" contingent order (Sell
1 @1545.75 SynSTOP) which is attached to a placed order (Buy 1 @1550.50
STOP) is represented in the figure at the right.
|
|
|
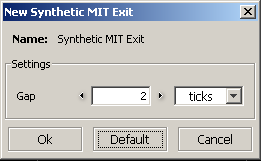
9. Synthetic MIT Exit
This type of exit contingent order is the pair of the "Synthetic
MIT Entry" entry contingent order. The difference between
them is that an entry contingency can be placed alone and can be
attached to a placed order, too and the exit contingency can
just be attached to a placed order.
The user can specify the "Gap" which is the distance
between the market price and the contingency. The distance can
be specified in: ticks, points, $ and %.
By pressing the "Ok" button, the user validates his selections. By
pressing the "Default" button, he makes the new settings to be
default in the following. By the "Cancel" button, he interrupts this
action and goes back to the initial frame, without any contingent order placed.
|
|
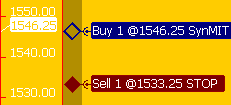
An example for a "New Synthetic MIT Exit" contingent
order (Buy 1 @1546.25 SynMIT) which is attached to a placed order (Sell
1 @1533.25 STOP) is represented in the figure at the right. |
|
This is the third section of the "Contingency" menu and it
contains 3 elements: "Contingency Details", "Edit Contingency" and "Delete
Contingency". This section is active, when there is, at least, one
contingent order placed.
You can see an example for an "Attach Bracket Exit" contingent order.
This contingency is an exit type contingent order and it is attached to a placed order.
If the user selects the "Contingency Details" option for this type
of contingent order, the following window appears:
|
|
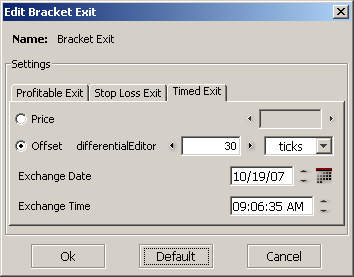
If the user selects the "Edit Contingency" option for this
type of contingent order, the edit dialog box will appear. This dialog box
has three tabs, because the "Bracket Exit" contingent order is a
combination between three contingencies: "Profitable Exit", "Stop Loss Exit"
and "Timed Exit". The user can edit each of these
contingent orders. See the picture below.
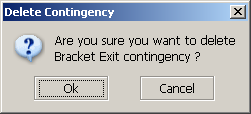
If the user selects the "Delete Contingency" option, a
dialog box will appear (see the picture below). In this dialog box the user
have to confirm that he is sure the perform the action. If he presses the "Ok"
button, the contingent order will be deleted.
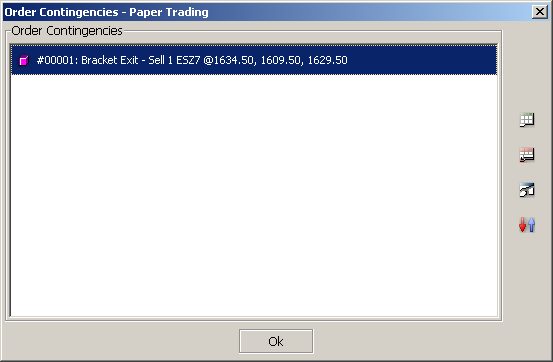
This is the fourth section of the "Contingency" menu and it opens
the "Order Contingencies" dialog box. This dialog box can be accessed
from the
Order Entry toolbar, from the
Contingent Orders Editor button, too.
This dialog box contains elements, if there are contingent orders placed in
the application. This dialog box (for the example with "Bracket Exit"
contingent order above) is represented in the figure below.
In the right side of this dialog box, there are 4 buttons:
 "Show Details" button opens
a dialog box, which describes the contingent order which is selected
in the "Order Contingencies" dialog box. For our
example, this description is represented in the figures below. As
you can see, this dialog box can be accessed directly from the "Contingency"
menu, from the "Contingency Details", too.
"Show Details" button opens
a dialog box, which describes the contingent order which is selected
in the "Order Contingencies" dialog box. For our
example, this description is represented in the figures below. As
you can see, this dialog box can be accessed directly from the "Contingency"
menu, from the "Contingency Details", too.
|
 By the "Edit
Contingency" button the user can edit the selected contingent
order's parameters. For our example, the window which appears is
represented in the figure below. As you can see, this dialog box can
be accessed directly from the "Contingency" menu, from the "Edit
Contingency" option, too. By the "Edit
Contingency" button the user can edit the selected contingent
order's parameters. For our example, the window which appears is
represented in the figure below. As you can see, this dialog box can
be accessed directly from the "Contingency" menu, from the "Edit
Contingency" option, too. |
 By pressing the "Delete Contingency" button, the user will
delete the selected contingent order from the "Order
Contingencies" dialog box and from the application, too. To
perform this action, the user have to confirm it.
As you can see, this dialog box can be accessed directly from the "Contingency" menu, from the "Delete
Contingency" option, too.
By pressing the "Delete Contingency" button, the user will
delete the selected contingent order from the "Order
Contingencies" dialog box and from the application, too. To
perform this action, the user have to confirm it.
As you can see, this dialog box can be accessed directly from the "Contingency" menu, from the "Delete
Contingency" option, too. |
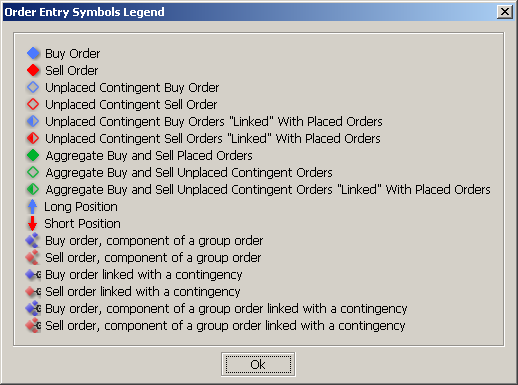
 If the user
presses the "Symbol Legend" button, the "Order Entry Symbols
Legend" window will appear. See the figure below. If the user
presses the "Symbol Legend" button, the "Order Entry Symbols
Legend" window will appear. See the figure below. |
In the "Order Entry Symbols Legend", the last 6 symbols are for
grouped orders. In the following these type of orders will be represented.
Example:
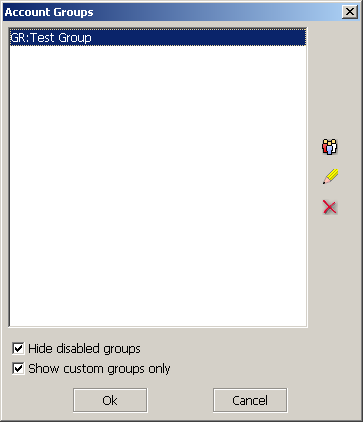
If a user wants to place a "group order", at first he needs to create an account group.
To create a new account group, the user have to press the
Account Groups
 button from the
Order Entry toolbar.
If he clicks this button, the following dialog box will appear:
button from the
Order Entry toolbar.
If he clicks this button, the following dialog box will appear:
|
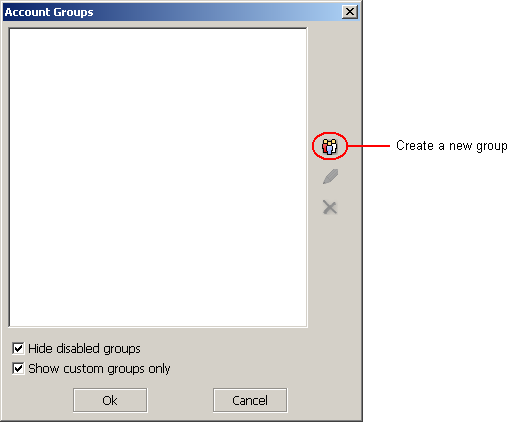
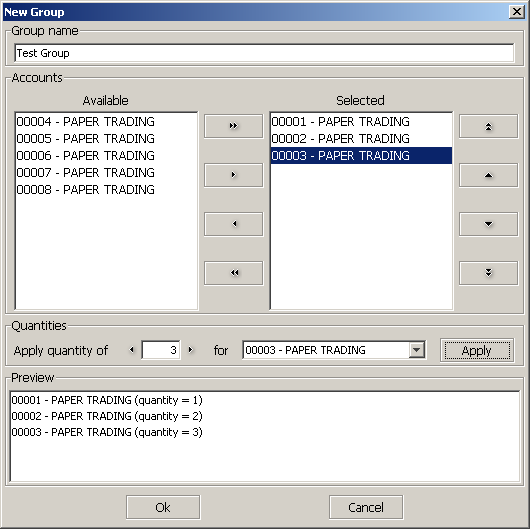
By pressing the "Create a new group"
button the "New Group" dialog
box will appear. To create a new account group,
first, the user will add a name for the new group in the "Group name" field
(in our example this name will be Test Group). After this, he will
select from the "Available" accounts, the accounts which will be
added to the new account group. To add an account to the group, he have to
select an account from the "Available" column and by the  button, he will add it to the "Selected" column. If he wants to add
all the accounts to the new account group, he will press the
button, he will add it to the "Selected" column. If he wants to add
all the accounts to the new account group, he will press the  button.
The
button.
The  and
and  buttons are used to remove an account from the "Selected" column.
After the accounts are selected, the user can specify for all of them, the
default order quantity in the "Quantities" section of the "New
Group" dialog box. He can apply one quantity for All the accounts or one
quantity for each of them. After he introduced the quantity, he have to
press the "Apply"
button to put into practice his settings. In the "Preview" section of
this dialog box, there are represented the accounts which will be added to
the new group and the default quantity for each of them. In our example, we
will select 3 accounts: 00001 - PAPER TRADING, 00002 - PAPER TRADING
and 00003 - PAPER TRADING and the quantities will be: 1,
2
and 3. See the figure below.
buttons are used to remove an account from the "Selected" column.
After the accounts are selected, the user can specify for all of them, the
default order quantity in the "Quantities" section of the "New
Group" dialog box. He can apply one quantity for All the accounts or one
quantity for each of them. After he introduced the quantity, he have to
press the "Apply"
button to put into practice his settings. In the "Preview" section of
this dialog box, there are represented the accounts which will be added to
the new group and the default quantity for each of them. In our example, we
will select 3 accounts: 00001 - PAPER TRADING, 00002 - PAPER TRADING
and 00003 - PAPER TRADING and the quantities will be: 1,
2
and 3. See the figure below.
|
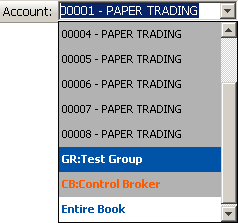
After the user pressed the "Ok" button, the created group will appear in the "Account Groups"
dialog box and in the
Account combo box from the
Order Entry toolbar, too.
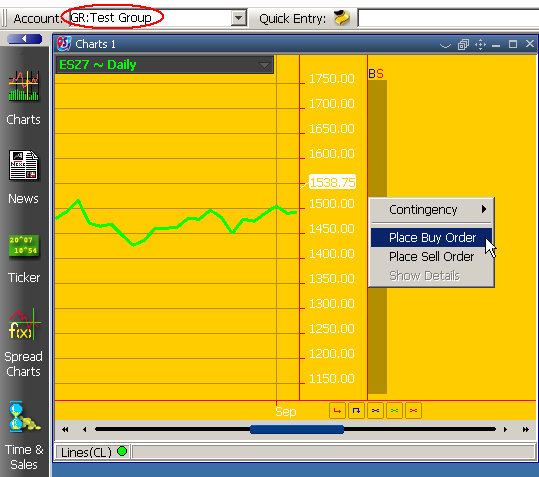
We will select the "GR:Test Group" account group from the "Account"
combo box and we will use it to place a "Buy" order in the Order Entry section
from the "Charts" frame. See the figure below.
The result will be a "group order":
The quantity for this order is 6, because when we created the account
group, we defined the default order quantity for each account separately and
we set for the 00001 - PAPER TRADING account 1, for 00002 -
PAPER TRADING 2 and for 00003 - PAPER TRADING 3. If we add this
numbers, we get 1+2+3 = 6. The figure above represents the "group
view" of this order.
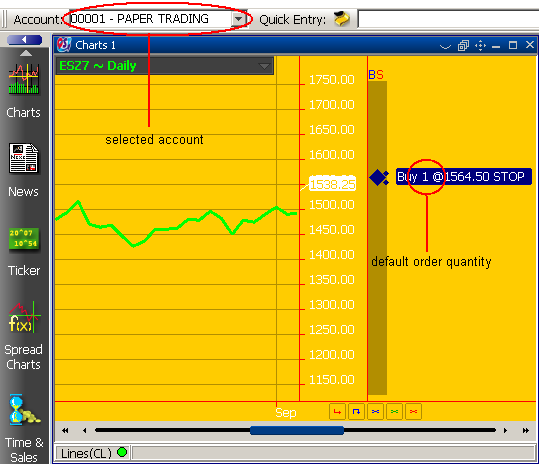
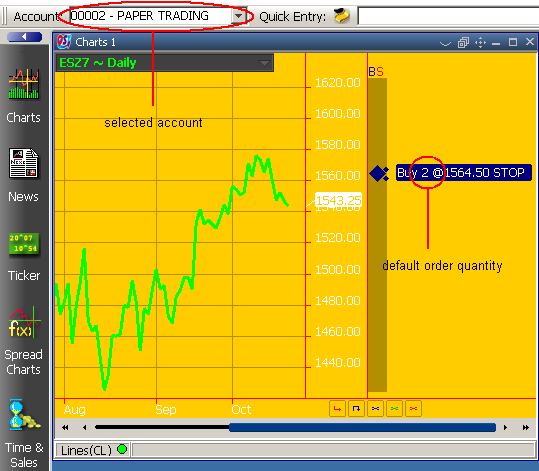
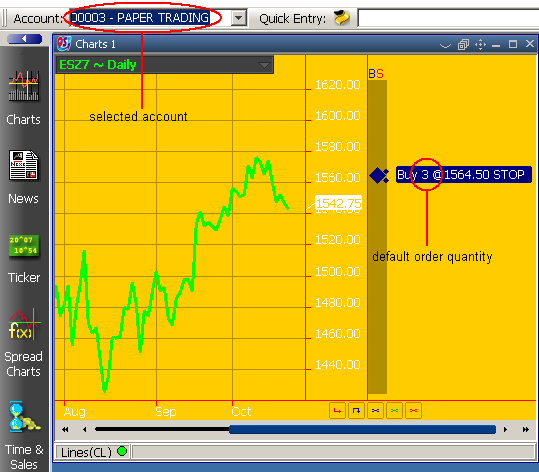
In the first three figures below, we will show how the above placed order
appears if we select (from the Account list) an account which belongs to the
Test Group. The last figure shows, that if an account is not in the group
for which we placed the group order, we have not an order placed.
In order to read more about Contingency Templates, please click here.