|
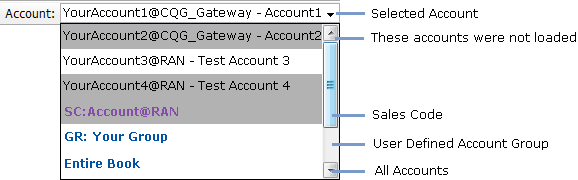
The user can select from this combo box the Order Entry Account or the account group which will be used next in the application. If the user is connected to more than one Order Entry servers, this list will contain all the Order Entry accounts and account groups from those servers.
The font colors and background colors used for this combo box depend on the type of the Order Entry accounts. For example, if the Order Entry Account failed to load following a successful Order Entry login (because of a connection timeout), it will appear with a grey background in the Account list. In order to customize this color, you should go to the Look tab of the Order Entry Properties dialog.
In order to read about Order Entry Account Groups, please click here.
|
|

|
You can use the Quick Entry Bar to place orders. When you click in the empty white field, a tooltip containing the required fields will appear, for assistance:
Account - Order Entry account
B/S - B for Buy and S for Sell
Qty - quantity
Ctr - contract symbol
Stk - strike value
@Price - price
OrdType - the type of the order
The progression of your typing will be marked by rendering the already-completed fields in a bolded font.
|

|
On the Order Entry Toolbar you can find all the necessary buttons for trading actions. The displayed buttons will be different for Paper Trading and Live Trading.
|

|
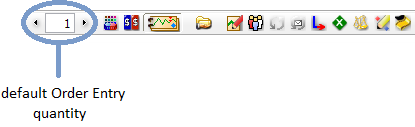
From the first cell in this toolbar, you can change the default quantity that will be used when you place an order. This value can also be changed from the Order Quantity tab of the Order Entry Properties dialog.
|
|
 Order Entry Properties
Use this button to open the Order Entry Properties dialog. It can also be accessed by pressing the F5 button. In order to read more about this dialog, please click here.
 Show Order Ticket
This button opens the Ticket Entry window. This is the form that allows the user to place orders; please note that by using  this button, your form will always be launched as an external frame. Launching the Order Ticket by any other means will display it as a regular, internal frame.
This button switches between Paper Trading and Live Trading (the same action can be done by pressing the F7 button). Paper Trading is a simulated environment for exercising, risk-free, trading strategies. In Live Trading the user can place real orders. In order to read about the differences between Paper and Live Trading mode, please click here.
In order to change your Live or Paper Trading settings, you need to check the first two tabs of the Order Entry Properties dialog.
By pressing this button you can enable or disable the Shared Order Book functionality. This option concerns Order Entry configurations based on user-type logins (providing multiple-account access), and not single-account logins.
By using this option, if there are other users (in the sense specified in the previous phrase) connected with the same Order Entry accounts, you will be able to follow their activity (such as placing orders, receiving system messages). Having an account on the shared list basically allows you to monitor all external activity on that respective account.
As a recent modification, the Shared Order Book settings were moved from a previous location (separate Order Entry Properties tab), to the Live Trading tab. In order to learn more about this change and the Shared Order Book functionality, please click here.
 Paper Trading Editor
This button is available just in Paper Trading mode and it will open the Paper Trading Editor, where you can place orders using your Paper Trading accounts, watch/change your previously placed orders, your fills and positions. In order to read more about this, please click here.
 Account Groups
By pressing this button, the Account Groups dialog will be opened, where you can create new account groups by grouping your existing Order Entry accounts. In order to read more about Account Groups, please click here.
Using this button the user can require a refresh for his dates from the Order Entry server. This button is disabled in Paper Trading mode.
By clicking this button the user requires a refresh for new messages from the Order Entry server. This button is disabled in Paper Trading mode.
By pressing this button, the user can select the positions which he needs to flat for the current Order Entry account or account group. After the user selected the positions from the Offset All Positions dialog, he needs to press the Ok button in order to confirm or the Cancel button, in order to interrupt the action.
This button opens the Cancel Orders dialog box, where the user can check/uncheck the orders he needs to cancel. Using this tool, he will cancel all the working orders for the current Order Entry account or account group. If he presses the Ok button, all the selected orders will be cancelled. The Cancel button will interrupt this action.
 Show Account Information
This button will open an Account Information frame. In order to read more about is, please click here.
 Contingent Orders Editor
After this button is pressed, the Order Contingencies dialog will appear. This dialog box contains elements, if there are contingent orders placed in the application and helps the user to make modifications on the existing contingencies. In order to read more about this, please click here.
In order to read more about contingent orders, take a look at the Contingencies section of this Help.
 Video Help for Order Entry
This will open a web browser and will give you video instructions for Order Entry.
|
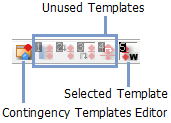
Contingency Templates allow a user to preset the exit contingent orders automatically at the time an entry trade is placed. The selected template shows which exit contingent order will be placed automatically.
The first,  Create Contingency Templates icon is always available. The other buttons will appear after the user creates new contingency templates. So, the structure represented in the figure at the right, is just an example. Create Contingency Templates icon is always available. The other buttons will appear after the user creates new contingency templates. So, the structure represented in the figure at the right, is just an example.
In order to read more about Contingency Templates, please click here.
Take a look at the Contingencies section of this Help, in order to read more about contingent orders.
|
|
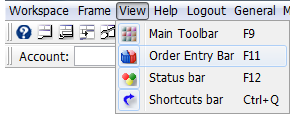
You can hide the Order Entry Bar, if you go to the main menu of the application, select View and uncheck the Order Entry Bar option or press F11. If you repeat this action, the toolbar will appear again.
|
|
|
In order to customize the Order Entry Bar, you just need to right-click on it, select Customize and the Quick Entry Bar Toolbar Properties dialog will be shown. You can also open this dialog, if you go to the main menu, select Order Entry and Customize Order Entry Toolbar or if you double-click the double vertical lines at the leftmost side of the toolbar (you may visually identify them in the above screenshot's leftmost side).
|

|
From the Quick Entry Bar Toolbar Properties you can add, remove and reorder the displayed items of your Order Entry Toolbar. You can also change the icons' size and glow color.
On Available Items section there are 4 buttons from where you can:
 add all items add all items
 add selected item add selected item
 remove selected item remove selected item
 remove all items remove all items
On Displayed Items section there are 4 buttons from where you can move the selected item:
 to top to top
one position upper
 one position lower one position lower
 to bottom to bottom
In order to change the Icon Size, you should choose between Small and Large. If you want to modify the Glow Color for the icons, press the  button and select the color you need. button and select the color you need.
|

|
 /
/  Toggle On/Off the Paper Trading
 /
/  Toggle On/Off the Shared Order Book
 Requiry the Order Entry Server
 Check for New System/Account Messages on Order Entry Server
 Offset All Positions
 Cancel All Working Orders