 Account Groups
|
|
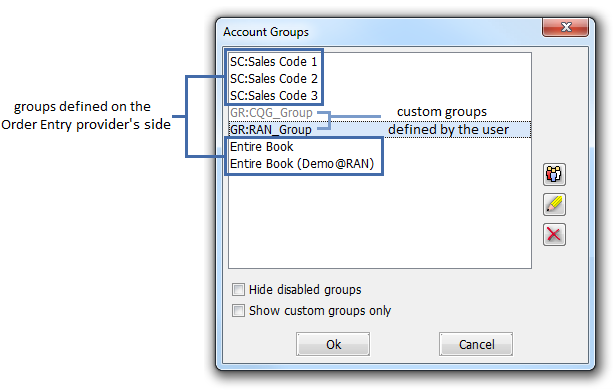
Account GroupsIn the Account Groups dialog you can create user-defined groups by combining items that appear in the Account Bar, such as Order Entry accounts, Sales or Office Codes (these last two being groups defined on the Order Entry provider's side).
Before describing the functionality of Account Groups, it is important for the reader to become acquainted with three important settings in the Actions & Properties tab of the Order Entry Properties dialog that alter its use. In order to open Order Entry Properties, please press F5 on your keyboard.
Group orders are enabled by checking the Place Group Orders when in Group View option.
By checking / unchecking the Show account groups including Entire Book and Sales Codes option you will show / remove all the group accounts from the Account Bar. As the name reads, upon disabling it, the Order Entry provider-defined groups will be hidden, too, not only the user-defined ones (read on to learn about the distinction between the two).
The last setting, Show warning message when performing an order entry function on a default or custom group of accounts, instructs the platform to show a warning before placing an order for groups.

|
You need to be connected to at least one Order Entry provider in order to use this dialog. The account groups that appear in this dialog depend on the Order Entry providers you are connected to. You have two types of account groups: the groups which were defined on the Order Entry provider's side and the custom groups you create here by yourself. The group you created will immediately appear in the Account combo list from the Order Entry Bar and you will be able to select it and place orders. When you place an order for a previously created group, you will place an order with quantity 1 (by default) for each account from the group. As a new feature, you can also add sales or office codes to a custom group. In this case, when you place an order, it will use for each account from the sales code the quantity you set for the respective sales code. A very useful functionality of the Account Groups dialog is that you can define different quantity for each account (or sales/office code) from the group. The groups which were defined by the Order Entry provider cannot be deleted. You also cannot change the list of the accounts from this kind of groups. The only operation you can do is to change the default quantities for each account from this group. A necessary condition for having a custom group enabled is to be connected under all the Order Entry users that contain each and every account that is part of that group; otherwise the custom group will be disabled. As about the user-defined custom account groups, you can delete them, even if they are disabled, but you cannot edit them, just when they are enabled. For custom account groups you can change both the account list and the default quantities. It is important to mention that you cannot add the same account twice to a custom account group. If you try to add an account that has already been added to the group by an office/sales code, you will get the 'This account was already added to the Selected list by a group' warning. In this case, you need to remove the sales/office code first and then you can add the accounts you need. There is another similar case, when you already added some accounts from the sales/office code and you are trying to add the sales/office code too. In this case, you will get the 'Some accounts are already added from this group to the Selected list, please remove them first' warning. |
|
|
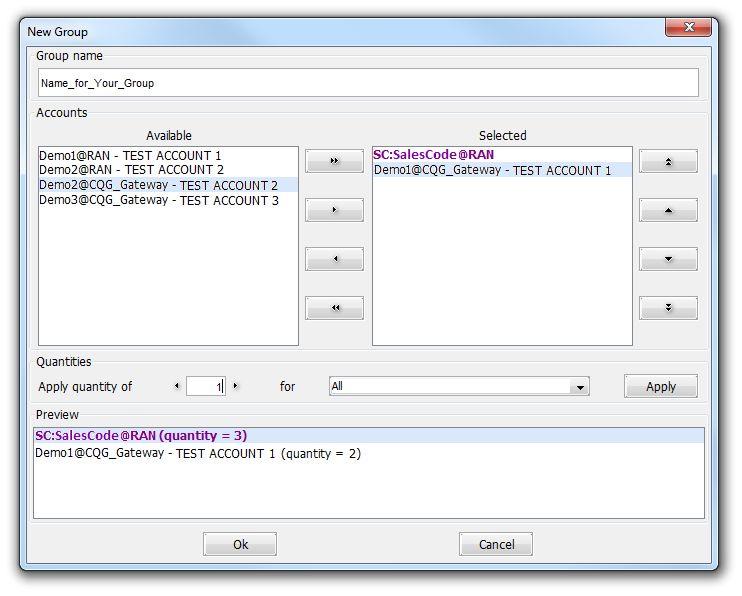
By pressing the In this dialog box you can add a name for the group that will be created and then, by selecting all ( By using the arrows from the right side of the dialog ( In the Quantities section of this dialog box, you can set the default order quantity for each of the selected accounts (or sales/office codes). You can apply one quantity for All the accounts or different quantity for each of them. After you introduced the quantity and selected the account you want to set the default quantity for, press the Apply button to put your settings into practice. In the Preview section of this dialog box, you can see the accounts (or sales/office codes) that will be added to the new group, along with the default quantity for each of them. By pressing the By pressing the An account group is disabled if it doesn't have all its accounts available. You need to be connected to all the Order Entry servers that give you access to the Order Entry Accounts for the respective Account Group. When the Hide disabled groups option is checked, the disabled groups are not visible in the Account Groups list. If the Show custom groups only option is checked, only user-created account groups will be displayed. |
|
|
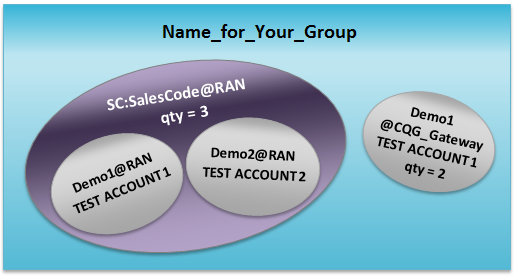
The custom account group that is presented in this example (refer to the Selected list in the New Group dialog from above) was created by adding a RAN sales code (which contains 2 accounts) and a simple CQG account to a group named Name_for_Your_Group. We also changed the default quantities for each element of this group with 3 (for the sales code), 2 for the single account respectively, by selecting 3 in the Apply quantity of field and SC:SalesCode@RAN in the for list and finally pressing the Apply button, then repeating the same (but using quantity of 2 this time) for the second element of the group. When you will use this custom group to place an order, you will get the following quantities for the accounts:
|
|
 button, the New Group dialog will be opened, which is represented in the following figure.
 ), select (
 ), remove (
 ) and remove all (
 ) buttons, you can move the accounts from the Available column to the Selected column or back. The accounts from the Selected column will be added to your new group.
 ,
,  and
and  ) you can change the order of the Order Entry accounts that will be added to this Account Group.
 button, you can edit an account group that was created before. The Edit Group dialog box has the same options like the New Group dialog box. The difference is that, in the Edit Group dialog box, the user changes an existing group.
 button, you can delete the selected account group from the Account Groups dialog. Before deleting, the application asks you to confirm this action.