 Column Filters & Sorting
|
|
Column Filters & SortingThe application contains frames that may be customized by filtering their contents; this tutorial will focus on the most widely-used class of filters, the Column Filters, simply called "filters" from this point onwards.
|
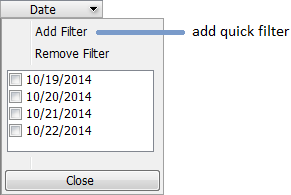
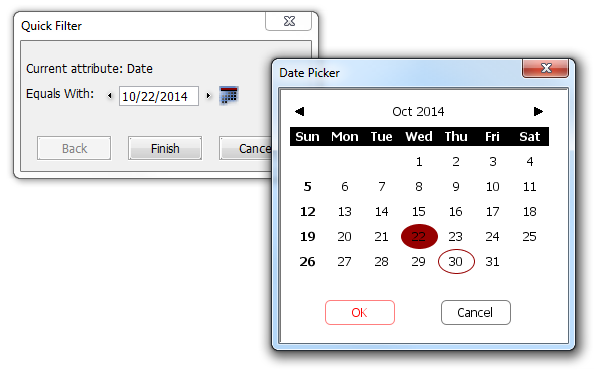
The easiest way to add a filter to this kind of tables (e.g. Block Trades or Orders & Positions Monitor) is to click (or right-click) on a column header and select Add Filter from the drop-down pop-up (take a look at the image on the right). This header's identity becomes the filtering criteria. The filtering criteria (always a single one for "quick" filters!) depends on the column you clicked on. We will use a Block Trades frame to illustrate: you can create a filter for the Contract that begins with certain characters, the Date you are interested in or the Last price that equals a certain value, etc.
|
|
|
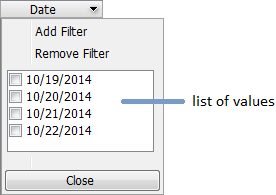
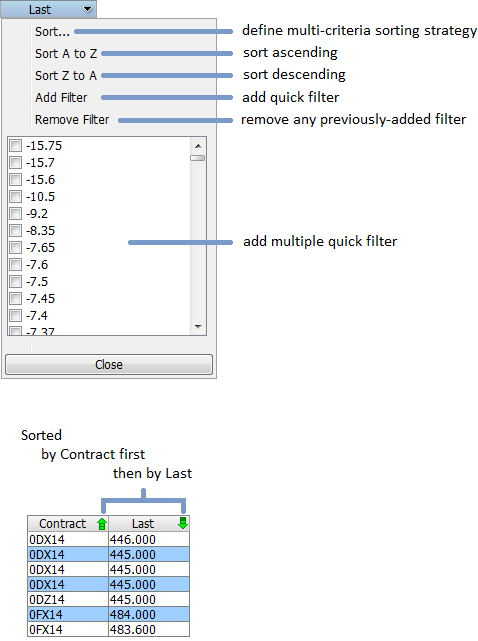
Using the Date column as an example, the right-side caption illustrates yet another way of limiting the displayed trades to a particular subset (in this case, those that took place at particular dates). This list allows multiple selection. As soon as at least an option is checked, the effect will be visible in the table. The Filter Text Field will spawn the text representation of the filter. A column that a filter has been applied on will display a small funnel icon
Edit Filter allows one to alter the filter's underlying formula, whether single- or multiple-criteria (as is Complex Filters, discussed below). Remove Filter will eliminate any filter that has been set up on this criteria, even if it has components spanning over other criteria as well (as in Complex Filters, discussed below). This operation will always be applied as a whole, therefore the filter will be removed in its entirety. |
|

It will be useful to reveal at this point that any Filter has a logical expression. Each Filter has at least one Rule, and each Rule has at least a Condition. A few examples will clarify this:
+([Contract] = 'ENQ15') reads: include ("+") only trades on ("=") Contract ENQ15.
-([Contract] = 'ENQ15' AND [Date] = {10/22/2014}) reads: exclude (hence the "-") all trades on ("=") Contract ENQ15 (AND) that also have the ("=") Date 10/22/2014. This filter has one rule ("exclude") and two Conditions, on two different criteria.
+([Contract] = 'JAX14')+([Date] = {10/24/2014}) has two "include" rules: include all trades on ("=") Contract JAX14 (while) having the ("=") 10/24/2014 trade Date.
+([Contract] =* 'RR')-([Contract] =** 'Z14') show all trades on contracts that begin with ("=*") the letters RR but exclude those that have the string Z14 anywhere ("=**") in the contract name. For example, this filter would show RRBX14, but would exclude any December contract, such as RRBZ15.
A filter for softs would sound like: +([Contract] =* 'EKC' OR [Contract] =* 'ESB' OR [Contract] =* 'ECO' OR [Contract] =* 'ECT' OR [Contract] =* 'EOJ')
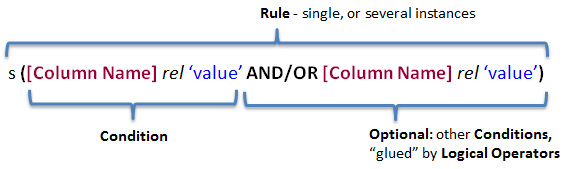
To wrap it all up, a Filter's syntax is:
|
, where:
s as sign, + for inclusion and - for exclusion
[Column Name] is the column header taken from the table (the criteria), whether Block Trades or Orders & Positions Monitor. It must be entered exactly as it appears in the frame and it is enclosed in square brackets.
rel ("relation") is one of the following:
= Must be the mathematical equivalent, or an exact and complete string match.
!= Anything except the provided value.
< Less than.
> Greater than.
<= Less than or equal to.
>= Greater than or equal to.
=* [Column Name] begins with provided string.
=** [Column Name] contains provided string.
'value' is the content of the cells under [Column Name] to be matched. Please note that this parameter supports intervals; for example a construction like: +([Last] = 0.2570..0.2930) covers all the values in that interval, endpoints included.
AND / OR are used when filtering for multiple conditions:
AND requires both/all conditions to be met.
OR requires only one of the listed conditions to be met
|
The formulas discussed above can be typed directly in any frame's Filter Text Field and then applied (by pressing the Enter key), Edited or Removed (as previously described); this field is located at the top of every frame that supports Column Filters. |

|
|
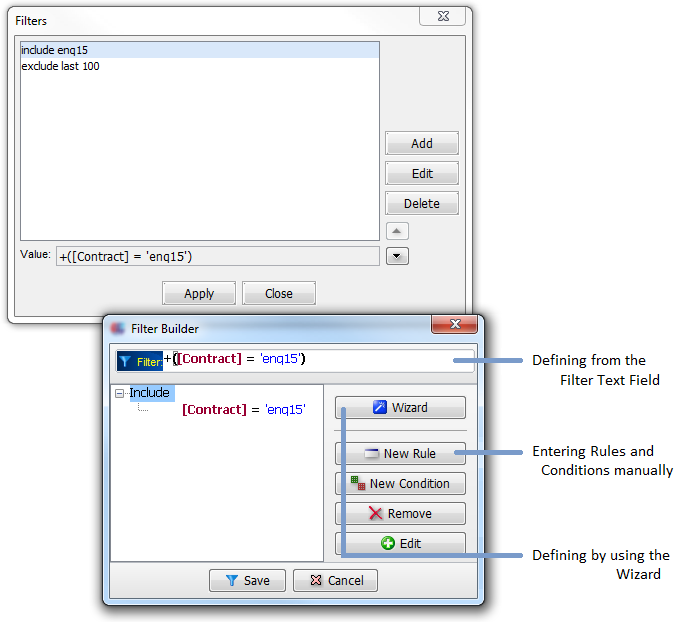
The same frames we mentioned above can be customized by pressing the Column Filters button in their interface. This will invoke a dialog that enables you to define "composite" filters (ones that take into consideration multiple criteria). Take a look at the image on the right. The Filters dialog displays a list of filters you have created and saved so far. Click on one to select it; then: Apply – applies the filter in the table and quits this dialog; Edit – customize the filter (through the Filter Builder dialog); Delete – remove filter from list; Close – disregard any change, hide dialog. The Value field will always show the formula for the selected Filter. The The Add button will take the user to the Filter Builder dialog, where complex Column Filters can be created using one of the following strategies: 1. Defining from the Filter Text Field |
|
1. Defining from the Filter Text Field
One may simply type a filter (based on formulas explained here) in the Filter Text Field located at the upper-side of this dialog. Pressing Enter marks the completion of the filter and displays its structure in the pane below the text field.
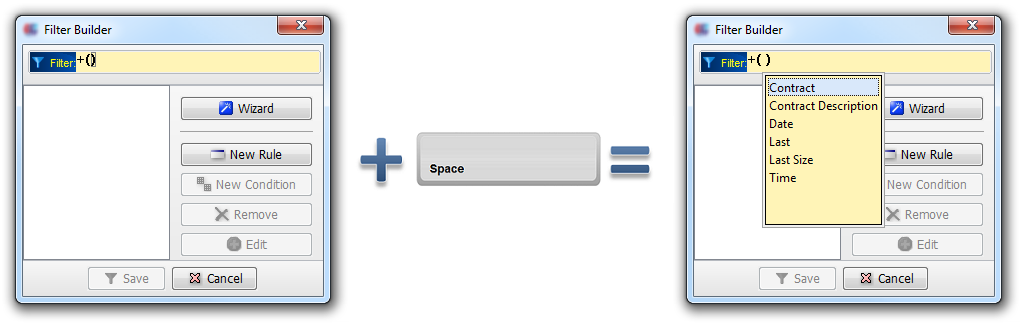
It should be noted that this widget, as well as the one located at the very top of the frame itself (e.g. Block Trades or Orders & Positions Monitor), offers auto-complete assistance: it can be invoked at any time by pressing Space. The screenshots below shows the effect of doing so, after having typed-in a small part of a Filter:
|
In order to enable the auto-complete function for the Filter Text Field, go to Application Properties, Layout and Organization tab and make sure the Enable autocomplete for filters option from the Editors section is checked.
2. Defining by entering Rules and Conditions manually
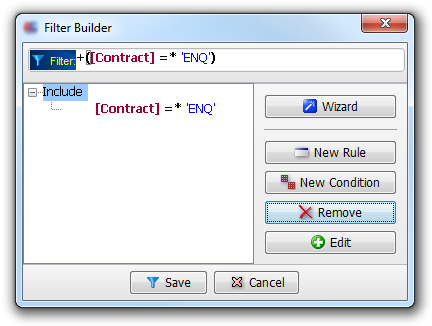
The first step is to define a Rule, by using the  New Rule button. This means deciding whether the Rule will mark an inclusion (+) or exclusion (-), the criteria (column name), the relationship and the value. The "magic wand" button
  on the right will allow one, based on the prior selections, to choose from a list of pre-defined values, instead of simply typing it in.
The progression below demonstrates the set up of the +([Contract] =* 'ENQ' AND [Date] = {10/27/2014}) filter.

|
Once the Ok button confirms, the structure on the Filter so far will be shown in the Filter Text Field and in the pane below it:
|
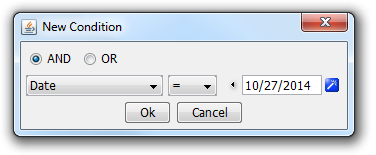
At this moment, it is possible to either add yet a New Rule, or follow-up with another Condition in the current one. For the sake of our example, we will continue with the latter by clicking on the  New Condition button. The selections will lead to this combo:
|
, and the final configuration of the Filter will be:
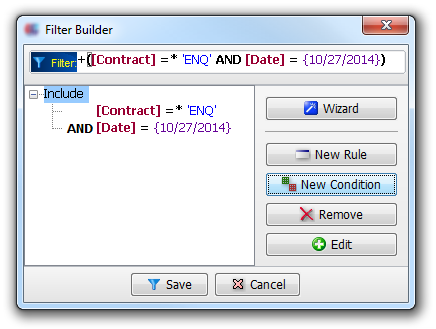
|
3. Defining by using the Wizard
By pressing the Wizard button, setting up a Filter is simply a matter of following answering questions and following the instructions on the screen.
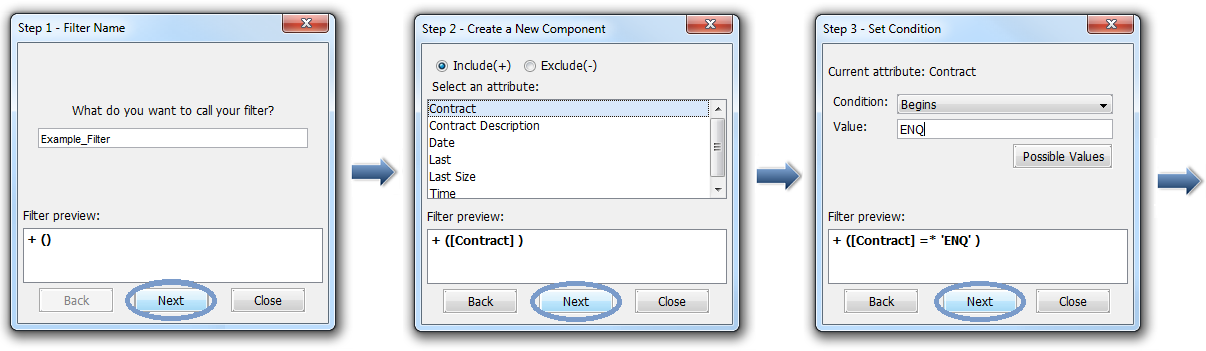
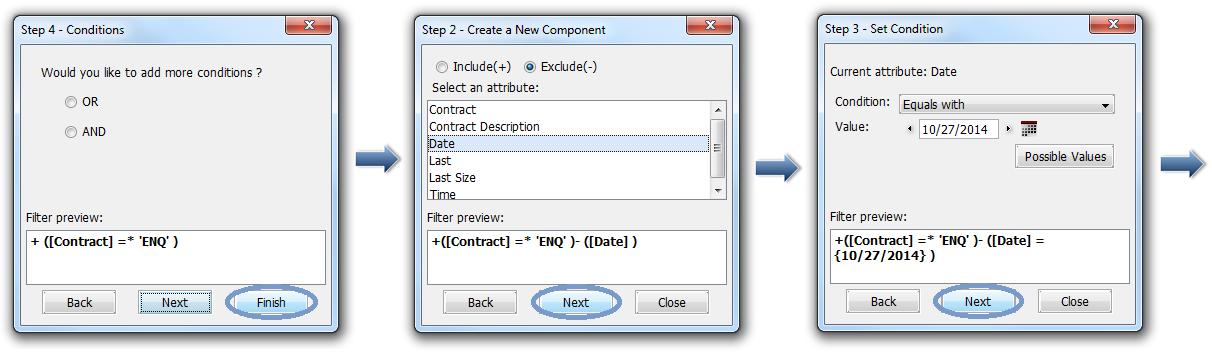
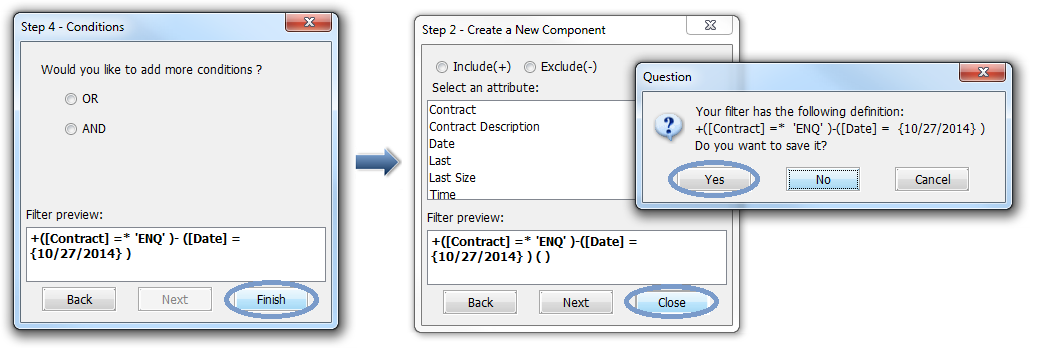
The step-by-step guided setup of the +([Contract] =* 'ENQ')-([Date] = {10/27/2014}) consists in following these steps:
|
|
|

|
Important Note: Each setup, regardless of the chosen strategy, will be complete only once the  Save button at the bottom of the Filter Builder is pressed, and the Filter is named. It will then be added to the list of available predefined Filters in the dialog with the same name. Pressing
  Cancel will disregard any change and close the dialog.
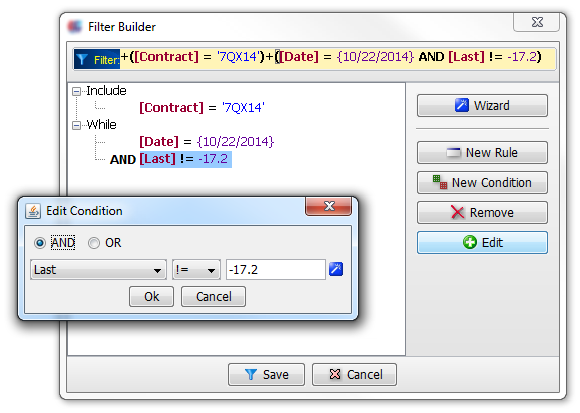
When a filter consists of multiple Rules and / or Conditions, the particular element to Edit / Remove needs to be selected first by left-click. Next, press the  Edit /
  Remove buttons, or right-click anywhere in the pane below the Filter Text Field and use the popup items instead.
|
|
The application contains frames with sortable tables (e.g. Block Trades or Orders & Positions Monitor). In this kind of tables, each column's header when clicked (or right-clicked) on, will display a drop-down pop-up that allows you to sort the table or add a filter. Once again we will use the Block Trades frame as an example. The screenshot on the right breaks down the typical actions. The filtering criteria will be the one we clicked on – in our example, the Last price. Please note that, depending which header you click on, the options may differ a little. Sort... opens a dialog that allows one to "chain" up to 3 sorting criteria. In the example below, we sorted ascending by Contract and then descending by Last price.
Sort A to Z and Sort Z to A are alpha-numerical. The Add, Remove and Edit Filter (not visible in our example) options will make changes on the filters of the table (read more here). Hit the Close button at the bottom to get rid of the pop-up. As soon as a sorting criteria was selected, the effect will be visible in the table. The column header will show a small green arrow that also indicates the sort type (ascending or descending) and the level of the criteria ( |
|

 buttons will move the selected Filter higher or lower respectively in the list.
 for 1st level,
  for 2nd and
  for 3rd).