Advanced Options Advanced Options
The Advanced Options frame provides detailed information about options for a given contract.
|
The underlying futures contract is entered in this field in order to access the options. Version 6.0 introduced the concept of the options "chain" to the application, allowing for support of various option types within the application. If no option type is requested explicitly, the platform defaults to American-style via the {A} notation as in the example at right. The Contract field allows for multiple delivery months and/or option types. For example, ES(Z14, H15){A} will display all American-style options that expire to ESZ14 and ESH15 respectively, while ESZ14{A, EF} will display all American-style and all European End of Month options expiring to the ESZ14 futures contract. More extensive information regarding use of the Contract field can be found here. The |

|

|
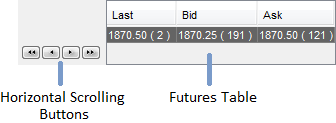
The Futures Table displays detailed quote information about the underlying futures contract in a fashion similar to the Quotes Monitor. Display columns may be added, removed and reordered via the Advanced Options Properties dialog. The dialog is opened with the Alt + P key combination and the column selection utility is under the Underlying Columns tab. Detailed information regarding these columns is available here. If the table contains more cells than the table display width will allow horizontal scroll buttons can be used to shift the displayed columns left or right ( |
|
|
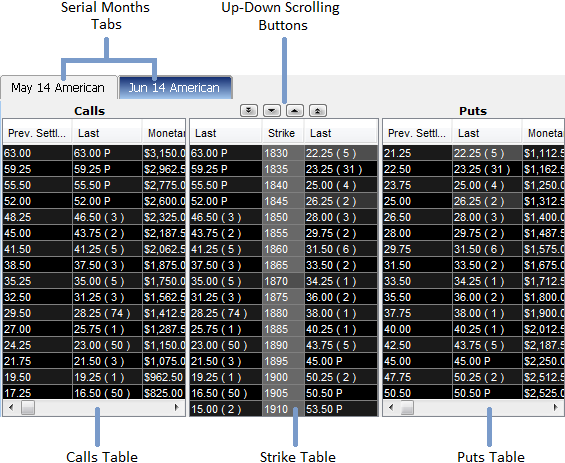
Some contracts may have multiple serial months attached to the same underlying futures contract. In this case, each month will have a separate tab with its Options Tables. By default, each tab is made up of 3 sub-tables: Calls, Puts and Strikes Table. The Calls/Puts Tables can be found on the left, and, respectively the right margins of the Options Table. The Calls and Puts tables can be displayed flanking the strikes, as described above, or in a Show Above/Below format wherein the Calls Table will appear above the Puts Table and the strikes will be listed on each. These Options Table display characteristics and can be configured from the Status Bar, discussed below. The Status Bar can also be used to choose to display only one of the tables, both or neither. Regardless of the settings, both tables will contain the exact same columns. Columns of the Puts/Calls Tables can be selected or removed from the Advanced Options Properties dialog (Alt + P on the keyboard) under the Options Columns tab. Detailed information about these columns is available here. The Strike Table contains the list of strikes available for the current serial month. Besides the central Strike column, additional columns may be added to the table. The columns can be mirrored to appear on either side of the market, making it easy to distinguish which data belongs to the Calls, and which belongs to the Puts. If the Show Above/Below display is chosen, this table will be hidden, and instead the Strike column will be added to both the Calls and the Puts Table (see the Status Bar section of this page). Columns of the Strike Table can be selected or removed from the Advanced Options Properties dialog (Alt + P on the keyboard) under the Fixed Columns tab. Detailed information about these columns is available here. The tables can be navigated via the scroll wheel on the mouse or by selecting a row then using the arrow keys on the keyboard. In addition to the scroll-wheel, the single-arrow ( |
|
|
All of the tables within the Advanced Options frame (Future, Calls, Puts and Strike) present sets of customizable columns. Horizontal navigation through the columns differs slightly between the Futures Table and the Options Tables when the table itself is wider than the display area. The Futures Table uses left and right single and double arrow buttons, whereas the Options Tables are make use of a scroll bar at the bottom of each display. Columns can be added, removed and reordered via the Advanced Options Properties (Alt + P). There are three tabs in this frame dedicated to editing the display of Advanced Options tables: Underlying Columns (for Futures Table), Options Columns (for Puts/Calls Tables) and Fixed Columns (for Strike Table) tabs. More information about the available Columns in Advanced Options can be found here. Drag and drop functionality (using the column headers) is supported for all tables, except Strikes (see the image on the right). |

|
|
This bar allows a quick view of the Options Profit/Loss, as well as certain Aggregate Greeks values. The Delta cells will update based on the currently selection Greeks model, the positions held in futures contract and positions of options displayed on the tables. The Gamma and Theta cells will update based only on positions held in options displayed on the tables and the currently selected Greeks model. This model can be changed in the Advanced Options Properties dialog's Greeks tab. Note: If one trades on both sessions of a contract (Pit and Electronic) and needs to see the aggregate delta on both sessions, he has to open the Order Entry Properties dialog (F5), go to Actions & Properties tab and check the Allow pit and electronic to offset each other option in the Miscellaneous section. |

|
|
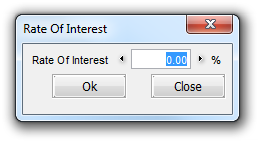
In the lower left corner the current active Rate of Interest percentage is displayed. A double click in this area will allow manual adjustment of the percentage to use going forward.
The middle section of the bar allows for configuration of the Options Tables display layout. Unchecking Show Calls, for example, will hide the Calls Table and expand the remaining two tables. Show Side by Side is the default display format, which will arrange the three Options Tables on the following order from left to right: Calls, Strike, Puts. Switching to the Show Above/Below option will arrange the Calls Table above the Puts Table and add the Strike column to both the Calls and the Puts Table (see at the image on the right). The same can be changed from the Advanced Options Properties dialog, Look tab, by selecting one of the Show Side by Side or Show Above/Below options. The display of the currently active Greeks Model is located in the lower right-hand corner of the frame. The default model varies from contract to contract. This model can be changed in the Advanced Options Properties dialog's Greeks tab. This same tab can be used to change any other setting that is related to Greeks for your Advanced Options frame. |


|
|
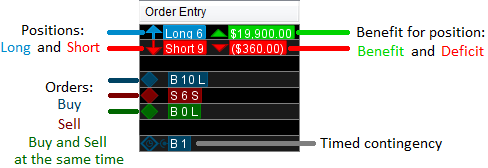
An order can be placed from the Advanced Options frame by left- or right-clicking one of the Last / Bid / Ask columns (tip: This feature exists in any frame that displays these columns). Advanced Options must be in One-click-trading Mode in order to take advantage of this method of Order Entry. General (but in-depth) Order Entry introductory material can be found in the Order Entry section of this Help. Order Entry settings can be changed from the Order Entry Properties dialog. Click here to learn more about these. Details regarding your orders and positions are displayed in the Order Entry cells in this frame. (If Order Entry columns are not displayed, they can be added from the Underlying Columns, Options Columns or Fixed Columns tab of the Advanced Options Properties.) A right-click on the Order Entry cell launches a pop-up menu that can lead to the Contingencies menu, as well as other choices, described here. |
|
|
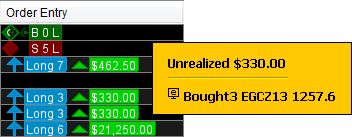
While hovering the mouse over anĀOrder EntryĀcell, a tooltip displays real-time account updates. (The tooltip, as well as other Order Entry settings particular to this frame, can be customized from the Order Entry tab of the Advanced Options Properties dialog. |
|
Depending on the location in the frame one right-clicks on, different pop-up menus will be displayed. These can be used to accelerate certain actions in the frame.
More information about the Pop-up Menu in Advanced Options can be found here.
Buttons on the Advanced Options Toolbar are described in a separate Help file, located here.
Information about the toolbar's location in the Application Layout is available here.
The Advanced Options Properties dialog provides access to change any Advanced Options setting.
Help for use of this dialog and its tabs is located here.
 button at the right side of the Contract field opens the
  shift focus to the first column,
  shift focus one cell to the left,
  shift focus to the last column).
 ) and double-arrow buttons (
 ,
,  ) can be used to scroll vertically through the Advanced Options tables. The single-arrow buttons adjust the view one row per click, while the double arrows allow a more substantial shift of content.