|
This top menu supplies a common housing for pretty much every action described in the following sections of this page. Workspaces, individual frames etc. can be controlled (or customized) through these menu items. There is a redundancy built in, for the user's convenience, making these accessible from within other contexts as well; the power-user will more often use the general keyboard shortcuts, or those specific to each frame.
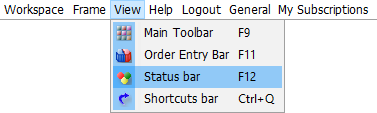
All these aspects will be covered throughout the documentation. As an example, the Main Menu in the screenshot ends with two entries - Charts and Chart Tools. These appear only when a frame of the type Chart is active. All functionality accessible through the Frame Toolbar will be available by clicking on the two already-mentioned menus, either through selection from a drop-down list or by using keyboard shortcuts.
|

|

|
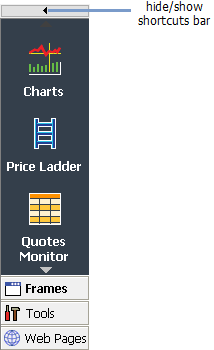
At the top of the desktop Shortcuts Bar there is a hide/show shortcuts bar button. You can hide the Shortcuts Bar to save some space on the screen. You can also hide / show the Shortcuts Bar by going to the main menu of the application, select View and check / uncheck Shortcuts bar. You can do the same by pressing the Ctrl + Q key combination.
At the bottom there are three buttons: Frames, Tools and Web Pages. Single clicking on one of the buttons will change the content of the desktop shortcuts bar. If you press the Frames button for instance, the icons for all the available modules will be shown on the bar. Single click on that button will create a new frame of that type.
The Frames section contains links to every module of this application. For example, to News, Charts, Quotes Monitor, Orders & Positions Monitor or Price Ladder.
You create a new Chart frame by single click on the Charts button. The frame will be created as a new internal frame.
The Tools section contains links to a lot of useful gadgets, as Alarms, Indicator Builder, Symbol Search or Spark Chat.
The Web Pages section contains links to web apps, like QST Weather or Futuresline.
|
|
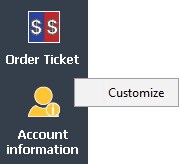
If you need to expand the workspace, you can customize the Shortcuts Bar, you can choose small icons and a small width for it. You can add or remove items from the Shortcuts Bar if you make a right click on it. After this, the Customize option will appear (see the figure at the right). If you click on it, the Desktop Shortcuts Bar dialog will open. To see how you can customize the Shortcuts Bar, click here.
|
 |
The left side of the status bar indicates your Connection Status to the application's servers (the main data-feed providers). In the right side, you have information about your Order Entry Connection Status.
Connection Status
|
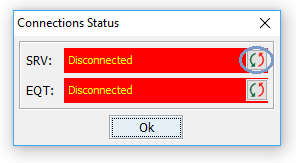
The Connection Status can show 3 possible states:
 status means that you are successfully connected the application's servers. status means that you are successfully connected the application's servers.
 status means that the application is disconnected from server. status means that the application is disconnected from server.
 status means that the application is reconnecting to server and the current data is updating. status means that the application is reconnecting to server and the current data is updating.
If a network problem occurs and the connection to our servers is lost, you can reconnect by double-clicking on the Connection Status bar and pressing the refresh button besides the SRV Disconnected field (take a look at the image on the right).
|
|
Order Entry Connection Status
Also the Order Entry Connection Status can be one of the following:
 status means that your Order Entry connection is alive.
 status means that you were disconnected from the Order Entry server.
 status means that you are connecting to the Order Entry server.
Click here to learn, how to reconnect when a network problem occurs and the connection to a the Order Entry server was lost. The same link will provide information about connecting to or disconnecting from a specific Order Entry provider by right-clicking on this status bar.
In order to customize the Status Bar, you need to go to the Application Properties (Ctrl + P) and select Customize Status Bar.
You can also hide / show the Status Bar by going to the main menu of the application, select View and check / uncheck Status bar. You can do the same by pressing the F12 key.
|
|
|
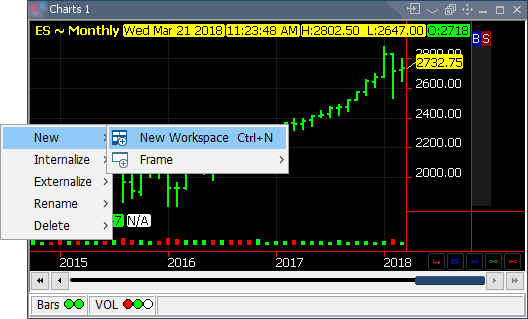
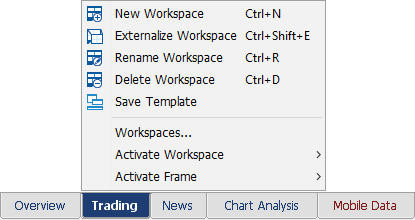
The software organizes the (internal) frames (such as: Charts, Quotes Monitor etc.) in containers, called "workspaces". A workspace can be activated by clicking on its tab at the bottom of the application � in the above screenshot, our workspaces are called, generically, "Workspace 1", "Workspace 2". Distributing frames in suggestively-named Workspaces enable users to access data in a convenient, fast and clutter-free manner.
One can change the name of a workspace by executing a double-click on the workspace's name. The order of the workspaces may be altered by drag-and-drop. A right-click on any workspace tab brings up a pop-up with useful shortcuts, such as: create New Workspace, Rename and Delete it. Naturally, on logout, if settings are saved, these changes will be preserved too.
Selecting to Externalize a Workspace, will move it in an external window. Within this window, pressing the Internalize Workspace button reintegrates it in the main application view.
The Save Template option will create a new template with the current workspace configuration. In order to read more about Templates, click here. One of these will allow you to pre-configure workspaces in future.
A right-click placed on an "empty" area of a workspace (in other words, one not covered by a frame) produces yet another popup-menu with a hierarchy supporting the same actions:
More information on workspaces and concerning operations can be found in the Application Toolbar section.
|
|
|
Every module instance that you create (e.g. Charts, Quotes Monitor etc.) is called a "frame". If you have 2 Charts and a Price Ladder shown in a workspace, you are looking at 3 frames. In order to read more about Frames, please click here.
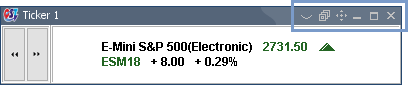
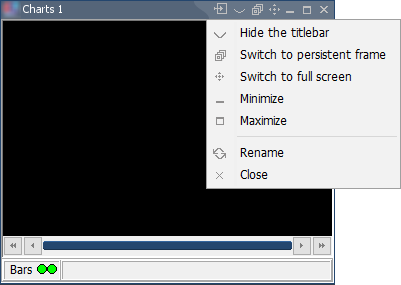
The Frame Buttons can be located in the right top side of each frame.
  Hide / Show the titlebar Hide / Show the titlebar
Hide the titlebar in order to save some space on the screen. After pressing this button, it will change into Show the titlebar. If you want to see the title bar again keep the cursor on the top of the frame a few seconds. The number of seconds can be set from the Application Properties dialog -> Desktop tab.
  Switch to persistent / regular frame Switch to persistent / regular frame
The Switch to persistent frame button will change the frame in a persistent one. A persistent frame is shown in all workspaces. This will change into Switch to regular frame from where you can set the frame to be a normal frame. A normal frame is a frame attached to it's workspace. A persistent frame will have at the end of the title name - P, from persistent.
 Switch to full screen / internal frame Switch to full screen / internal frame
The Switch to full screen button will change the frame into an external frame, and the button will change into Switch to internal frame that will do the reverse operation.
   Standard buttons Standard buttons
The last ones are the three standard frame buttons: Minimize, Maximize/Restore and Close.
If you right click on the titlebar of the frame, you can also select to Rename the current frame.
    Group Frames buttons Group Frames buttons
By using these buttons you can group your frames in a fashion similar to Linked Workspaces, but at a sub-workspace level. In order to read about this new functionality, please click here.
|
|
The toolbar of the application has two parts: the first part is common for all the frames and the second part changes it's content depending on the selected frame.
Application Toolbar

In order to read about the main toolbar of the application, please click here.
The action of right-click on the main toolbar and select Customize will open the Main Toolbar Properties dialog, where you will be able to select the number and order of displayed items of this toolbar or the size and the color of the icons.
Frame Toolbar

This section changes its content depending on the active frame. The items on the toolbar are described in each frame's respective Help section.
In order to customize this toolbar, you should right-click on it and select Customize. From the Toolbar Properties dialog you will be able to modify the order, the number and the color of the toolbar icons. The Icon Size depends on the Application Toolbar Icon Size and cannot be modified from here.

On the Order Entry Bar you can find all the necessary buttons for trading actions. In order to read more about this toolbar, please click here.
If you need to modify the order and the number of displayed items of this toolbar, you should right-click on it and select Customize. In the Quick Entry Bar Toolbar Properties you can also change the size and the color of the Order Entry bar icons.