 Quotes Monitor Toolbar
|
|
Quotes Monitor Toolbar
Please note that, depending on your subscription's level, some of the facilities described below may not be present. You can obtain access to a richer set of tools by upgrading your subscription.
The Quotes Monitor Toolbar is located at the top of the screen, above the Order Entry Bar and below the main Application Toolbar (take a look at Application Layout) and it allows you to perform different Quotes Monitor-specific actions by pressing the buttons that will be presented below. As explained in the linked page, please note that these toolbars may be hidden.

|
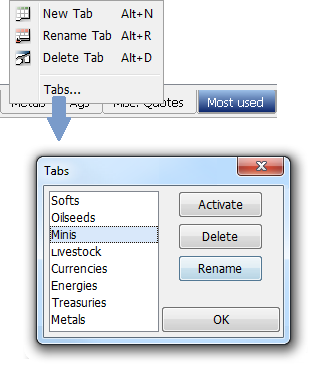
 New Tab
|
Will create a new tab in the current Quotes Monitor frame. When creating tabs, they will be assigned the following names bu default: Table 1, Table 2, ... an so on. You can change these names by pressing the Rename Tab button. |

|
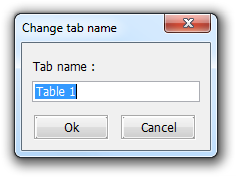
 Rename Tab
|
This will open a dialog from where you can change the name of the current tab. You can also change the name of the table by double clicking on the tab's name - this will have the same effect. |
|
 Delete Tab
|
By using this button you can remove the current tab from the Quotes Monitor frame. It is important to mention that the tab will be immediately deleted, without any further warning message. The actions from above can be also initiated from the tabs popup. This will appear when you right click on any of the tabs. The last Tabs... item from this menu, will open the Tabs dialog which can be used to switch to tab (by pressing the Activate button) or to rename and delete the Quotes Monitor tabs. |
|
 Contract Lookup
By pressing this button you will open the Contract Lookup Dialog. In order to read more about how to use this tool, please click here.
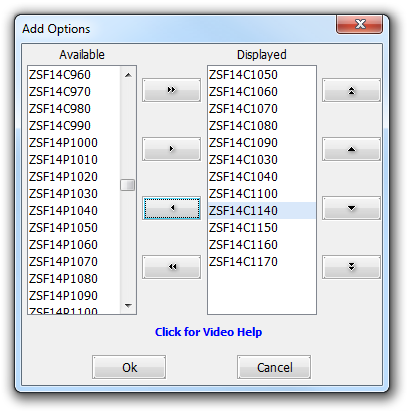
 Get Options
|
By using this functionality, you can get all the option contracts for the selected futures contract from a Quotes Monitor table. Select the contract's row you are interested to get the options for, click this button and the Add Options dialog will appear. From the Available column you can add the contracts to display in the Quotes Monitor table by moving them to the Displayed column. Use the |
|
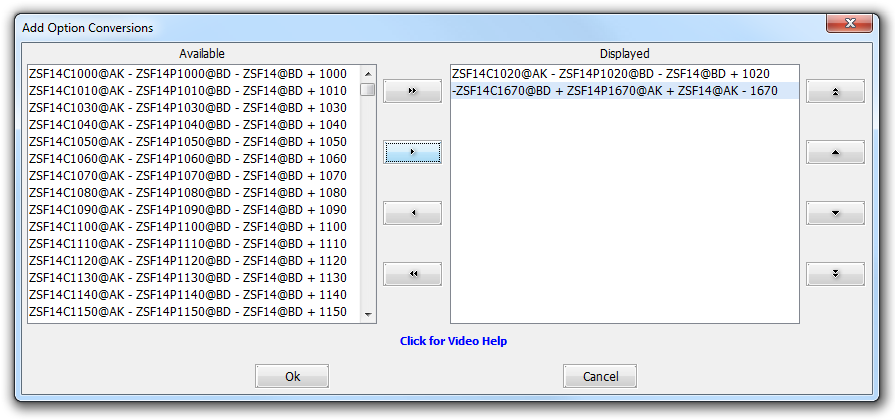
 Get Option Conversions
Displays a list of formulas derived from a future's set of options. For each option in the set, the generated formula will follow one of these patterns:
a. for a CALL option: call@AK - put@BD - underlying@BD + strike (e.g. ESF14C1835@AK � ESF14P1835@BD � ESH14@BD + 1835)
b. for a PUT option: �call@BD + put@AK + underlying@AK � strike (e.g. -ESF14C1835@BD + ESF14P1835@AK + ESH14@AK - 1835)
|
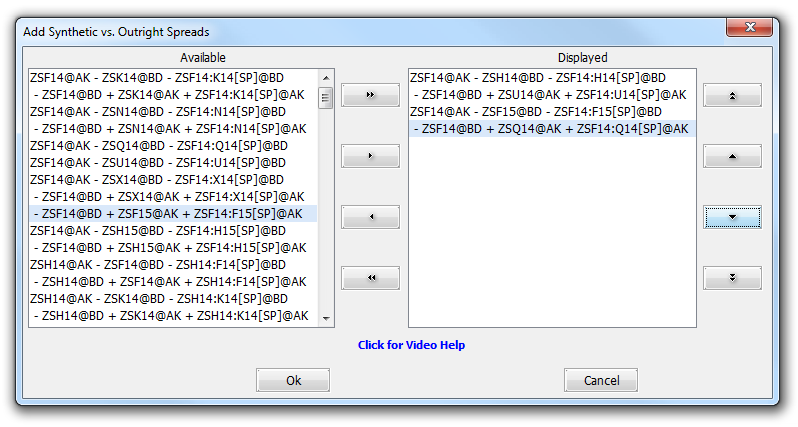
 Get Synthetic vs. Outright Spreads
Synthetic vs. Outrights will display a similar list with the one above. For each two contracts from a future's list of trading months, two spreads will be generated:
a. first@AK � second@BD � first:second[SP]@BD (e.g. for ZCN13 and ZCZ13: ZCN13@AK � ZCZ13@BD � ZCN13:Z13[SP]@BD)
b. �first@BD + second@AK + first:second[SP]@AK (e.g. for ZCN13 si ZCZ13: -ZCN13@BD + ZCZ13@AK + ZCN13:Z13[SP]@AK)
|
 Get Chart
Opens the chart for the contract you selected from a Quotes Monitor table. To get more information on Charts, please click here.
In order to change the way the chart will be opened, please go to the Triggering tab of the Application Properties dialog and change the settings from the Charts section.
 Alarms
This will open the Alarms dialog. You can enable/disable alarms for different contracts by using this tool. To read more about it, please click here.
Use this button to add an empty row to a Quotes Monitor table.
An empty row can be populated with the information for a contract (quote) by writing the symbol of the contract in the Contract cell and then pressing Enter. You can also use empty rows for delimitations in the table.
 Titled Line
Use this button to add a title row in a Quotes Monitor table.
On a title row you can write a text of your choice, for example the name of the Exchange for a group of rows; use it as a label.
 Remove Line
Use this button to remove the selected row from your Quotes Monitor table. It is important to mention that the row will be automatically deleted without any further notice or warning message.
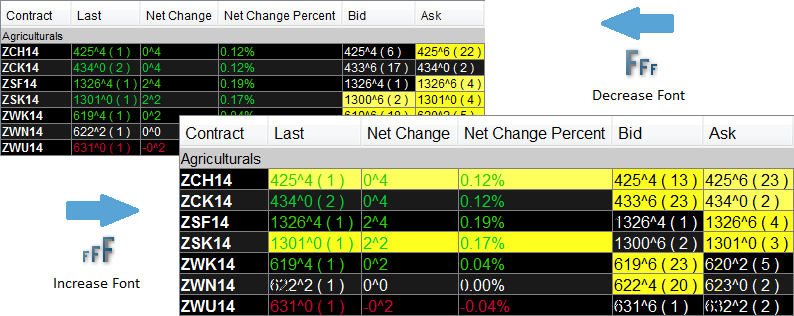
 Decrease Font
This will decrease the size of fonts that are used in Quotes Monitor. The dimension of the rows will also be modified accordingly.
 Increase Font
This will increase the size of fonts that are used in Quotes Monitor. The dimension of the rows will also be modified accordingly.
|

 Toggle Selection Mode
This button toggles between  Selection Mode and
  One-click-trading Mode.
The way a user interacts with the rows is defined by this setting. The Selection Mode allows one to select cells for dynamic export, while the One-click-trading Mode allows quick order placement, "grab" rows and change their position or trigger an action while double-clicking on a Contract cell (you can change this action by going to the Advanced tab of the Quotes Monitor Properties dialog).
Please note that the icon indicates the new mode that will be installed if clicked on, not the current state.

 Toggle Show/Hide Tabs
By pressing this toggle button, you can  Show or
  Hide your Quotes Monitor tabs. In order to read more about these tabs, please click here.
 Print
PrintUse this button to print your Quotes Monitor. In order to read more about this functionality, please click here.
 Copy to Clipboard
Copy to Clipboard is an advanced function, whose behavior will depend on a couple of factors.
If this function is included in your subscription, it will allow you to transfer static or dynamically-updated information to Excel (or other programs). Whether the transfer is static or dynamic, depends, again, on your subscription level, the way you paste the information and the target program (that you paste into).
A static copy (snapshot) of your Quotes Monitor's currently visible table will be sent to a program if one of the following is true: your subscription does not support dynamic linking, you paste the information into a software such as a text editor (any software that is not a spreadsheet application such as Excel), or, it does, but when pasting into Excel, you choose Paste Special and then any format different from HTML.
Live-linked (auto-updating) links will be pasted into Excel if you have access to this feature and after copying, you paste into a spreadsheet using the Ctrl + V (simple Paste) shortcut or right-click in a spreadsheet, select Paste Special and then HTML as format. Please note that these will update as long as your application is running.
While the above will send all the contents (quotes) in your frame to Excel, sometimes you will want to send only select cells to your spreadsheet. Make sure that your Quotes Monitor is in Selection Mode, and then include adjacent cells in your selection by holding down the left mouse key and moving the mouse to include cells; once you are happy with the information set, Copy to Clipboard and then Paste.
To learn more about Live Linking, please click here.
 Properties
This button opens the same Quotes Monitor Properties dialog that can be displayed by pressing the Alt + P key combination while the frame has the focus. In order to read a detailed presentation of each tab and setting from this dialog, please click here.
 Video Help
This will open a web browser and display video instructions related to the Quotes Monitor frame (if applicable; not all topics are covered).
 Help
HelpBy using this button you can open the Quotes Monitor-related Help files. You can open the same by pressing the Alt + H key combination.

When you open a Quotes Monitor frame in the current workspace, you will observe that a specific toolbar will be added to the right side of the Application Toolbar. The main and the frame-specific toolbars are delimited by a double-line separator.
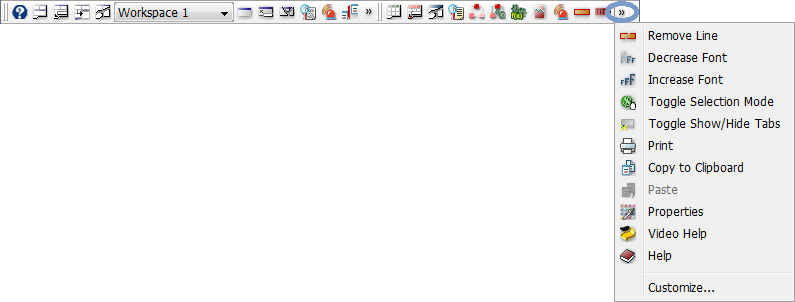
It is also possible that your screen size doesn't accomodate all the icons belonging to the Quotes Monitor toolbar at the same time. In order to have access to the hidden icons, you just need to press the  button.
|
If you hide the main Application Toolbar, your frame-specific toolbar will be also hidden. In order to read about how to hide or unhide these toolbars, please click here.
|
In order to customize the Quotes Monitor Toolbar you need to right-click on it, select Customize and the Quotes Monitor Toolbar Properties dialog will be shown. You can also open this dialog if you go to the main menu, select Quotes Monitor and Customize Toolbar from the bottom of the menu. When your buttons are hidden (as described in the About the Toolbar section) you can also use the last Customize... item from the menu that appears when pressing the The same dialog can be triggered by double-clicking the vertical lines from the beginning of the frame-specific toolbar (please take a look at the image on the right). |

|
|
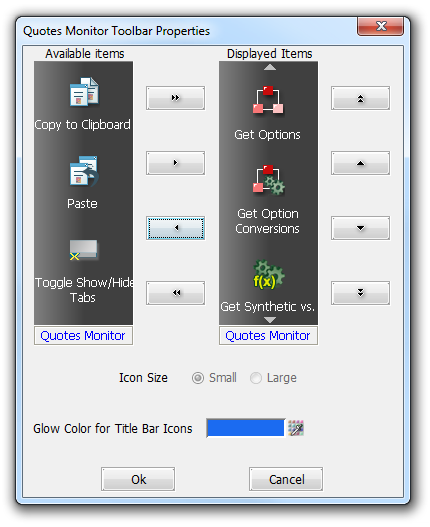
From the Quotes Monitor Toolbar Properties you can add, remove and reorder the displayed items on your Quotes Monitor Toolbar. The Icon Size depends on the size of the buttons used for the main Application Toolbar. In order to read about how to change this size, please click here. You can also change the icons' glow color by pressing the By the Available Items' list right side (containing elements not shown on your toolbar) there are 4 buttons which enable you to:
By the Displayed Items' list right side there are 4 buttons that you can use to move the selected item:
|
|
 (add the selected one),
  (remove the selected one) and
  (remove all) buttons to add/remove the options to/from the target column. To reorder the options in the Displayed column, please use the
  (move to the top),
  (move one position down) and
  button and selecting the color of your choice.
 to bottom