 New Frame
|
|
Every module instance that you create (e.g. Charts, Quotes Monitor etc.) is called a "frame". If you have 2 Charts and a Price Ladder shown in a workspace, you are looking at 3 frames.
New Frame|
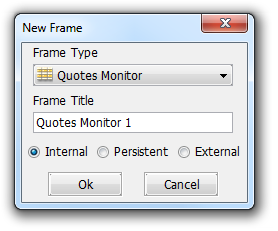
This will open the New Frame dialog. From Frame Type you can choose the frame you need to create (take a look at the List of Frames). You can change the order of the frames in this list by going to the Application Properties dialog, Desktop tab: if you check the Sort frames in the 'New Frame' dialog option, the frames will be sorted alphabetically; otherwise by their popularity. From Frame Title you can set a name for the frame which will be created. You can also choose if you want to create an Internal, Persistent or External frame. An Internal frame is contained in a workspace and it is attached to that workspace. A Persistent frame is shown in all workspaces and its title name always ends with a P, from persistent. An External frame isn't contained in the application's frame, it is a separate one. In order to read more about the Frame Buttons, take a look at the Application Layout page, Frame Buttons section. |
|
 Rename Frame
|
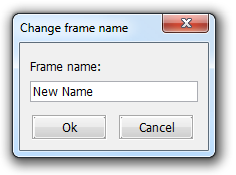
This will open the Change frame name dialog, from where you can change the name of the selected frame. In order to rename a frame, you can also right-click the frame's titlebar and select Rename from the menu. |
|
 Delete Frame
This will delete the selected frame from the current workspace.
 Enable Docking Frames
This option will enable the docking behaviour for your frames. Adjacent frames will practically be "glued" together (docked) and resizing your currently active frame will affect the neighbouring frames as well. For example, when resizing a frame to make it bigger, instead of covering up the other frames, it will move them away or adjust their size as well. The action taken when resizing a frame docked to another one depends on your settings, which can be configured under General, then Properties, on the very first tab under Docking. Take a look at the Application Properties section of this Help.
 Auto Arrange
This function will rearrange the frames in the active workspace, so that the available space is made best use of. This will also reveal frames hidden in the background (obscured by other frames), that you might've forgotten about.
 Show the Titlebars
This button will show / hide the frames' titlebars. You can do the same operation, if you right-click on the frame's titlebar and select Hide the titlebar from the popup.
When the titlebar is visible, in the right top corner of each frame you can see the frame's buttons. In order to read more about these buttons, please check the Application Layout section of this Help document by clicking here.
It is important to mention that your frames now can be grouped (in a fashion similar to frames inside Linked Workspaces, but a finer, sub-worspace level). In order to read about this new functionality, please click here.
