 Advanced Options Toolbar Advanced Options Toolbar
Please note that, depending on your subscription's level, some of the facilities described below may not be present. You can obtain access to a richer set of tools by upgrading your subscription.
The Advanced Options Toolbar is located at the top of the screen, above the Order Entry Bar and below the main Application Toolbar (take a look at Application Layout) and it allows you to perform different Advanced Options-specific actions by pressing the buttons that will be presented below. As explained in the linked page, please note that these toolbars may be hidden.

|
 Refresh Greeks
Allows you to manually refresh the Greeks values; only available when the Update Greeks Dynamically option is uncheked.
 Contract Details
This will open a dialog that contains details for the current contract.
 Trigger Daily Chart
This will create a daily chart for the last selected contract and display it in a new frame. You can change the settings of the Chart frame that will be displayed from the Triggering tab of the Application Properties dialog.
 Options Calculator
You can use the Options Calculator to quickly determine the Call/Put Implied Volatility and Option Value for a given Strike, so you don't have to browse the table and search for a specific row. All the factors used in calculating the Volatility or Options Value can be manually altered here, allowing you to experiment with different settings, which are separate (won't interfere with those) from the main table: Strike, Underlying Future value, Option Last trade value, Volatility (%), Rate Of Interest (%), Days or Trading Days Until Expiration (DTE/TDTE) or Explicit Date.
You can also change the Greeks Model by using the list in the middle of the calculator.
Press Calculate Implied Volatility to display the Implied Volatility on the bottom of the calculator (bolded in black).
Press Calculate Option Value to display the Option Value on the bottom of the calculator and the Delta, Gamma, Vega, Theta and Rho values on the right side of the calculator.
Press the Reset button to cancel all modifications made to the values on the left side, and bring them back to their original values.

|
 Decrease Font
This will decrease the size of fonts that are used in Advanced Options.
 Increase Font
This will increase the size of fonts that are used in Advanced Options. Take a look at the following image, that shows the Futures Table with two different font sizes.

|

 Toggle Selection Mode
This button toggles between  Selection Mode and
  One-click-trading Mode.
The way a user interacts with the option tables is defined by this setting. The Selection Mode allows one to select cells for dynamic export, while the One-click-trading Mode allows quick order placement.
Please note that the icon indicates the new mode that will be installed if clicked on, not the current state.
 Clone previous Sessions Implied Volatilities
Clones the Implied Volatilty based on the previous settlement (instead of the last trade) to the Usr. defined Volatility column.
 Clone Implied Volatilities
Clones the Implied Volatility column to the Usr. defined Volatility column.
 Clone Puts Implied Volatilities
Clones the Puts Implied Volatility column to the Usr. defined Volatility column.
 Clone Calls Implied Volatilities
Clones the Calls Implied Volatility column to the Usr. defined Volatility column.
 Clone Days to Expiration
Clones the data from the Days to Exp. column to the Usr. Days to Exp., where they can be edited.
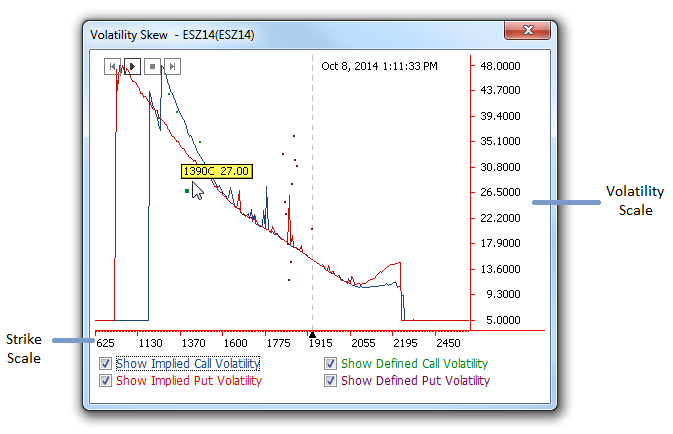
 Volatility Skew
A Volatility Skew chart represents the evolution of the Implied Volatilities in relation to Strike price.
By checking the Show Defined Call and Put Volatility option, the values one added into the Usr. Volatility column of the Advanced Options table will be also shown on the Volatility Skew chart.
The Defined Volatilities can be modified by moving any point with the mouse higher or under its original position.
The Strike Scale can be zoomed in and out by scrolling the mouse over it. The same way you can zoom in and out the Volatility Scale.
If you have checked the Take snapshots of options data option in the Advanced Options Properties dialog, Volatility Skew tab, then you can also "play a movie" with the volatility's evolution.
In order to change any setting for Volatility Skew, please go to the Advanced Options Properties dialog, and take a look at the Volatility Skew tab.
|
 Send Email
This will create a snapshot of the table and send it via e-mail.
By default, all the e-mail that are being sent from within the application, are sent to the e-mail account associated with your QST account (when it was opened). However, you can overwrite this setting by changing the Default recipient in the Layout and Organization tab of the Application Properties dialog.
 Print
PrintUse this button to print your Advanced Options. In order to read more about this functionality, please click here.
 Copy to Clipboard
Copy to Clipboard is an advanced function, whose behavior will depend on a couple of factors.
If this function is included in your subscription, it will allow you to transfer static or dynamically-updated information to Excel (or other programs). Whether the transfer is static or dynamic, depends, again, on your subscription level, the way you paste the information and the target program (that you paste into).
A static copy (snapshot) of your Advanced Options's currently visible table will be sent to a program if one of the following is true: your subscription does not support dynamic linking, you paste the information into a software such as a text editor (any software that is not a spreadsheet application such as Excel), or, it does, but when pasting into Excel, you choose Paste Special and then any format different from HTML.
Live-linked (auto-updating) links will be pasted into Excel if you have access to this feature and after copying, you paste into a spreadsheet using the Ctrl + V (simple Paste) shortcut or right-click in a spreadsheet, select Paste Special and then HTML as format. Please note that these will update as long as your application is running.
While the above will send all the contents (quotes) in your frame to Excel, sometimes you will want to send only select cells to your spreadsheet. Make sure that your Advanced Options is in Selection Mode, and then include adjacent cells in your selection by holding down the left mouse key and moving the mouse to include cells; once you are happy with the information set, Copy to Clipboard and then Paste.
To learn more about Live Linking, please click here.
 Properties
This button opens the same Advanced Options Properties dialog that can be displayed by pressing the Alt + P key combination while the frame has the focus. In order to read a detailed presentation of each tab and setting from this dialog, please click here.
 Video Help
This will open a web browser and display video instructions related to the Advanced Options frame (if applicable; not all topics are covered).
 Help
HelpBy using this button you can open the Advanced Options-related Help files. You can open the same by pressing the Alt + H key combination.

When you open an Advanced Options frame in the current workspace, you will observe that a specific toolbar will be added to the right side of the Application Toolbar. The main and the frame-specific toolbars are delimited by a double-line separator.
It is also possible that your screen size doesn't accomodate all the icons belonging to the Advanced Options toolbar at the same time. In order to have access to the hidden icons, you just need to press the  button.

|
If you hide the main Application Toolbar, your frame-specific toolbar will be also hidden. In order to read about how to hide or unhide these toolbars, please click here.
|
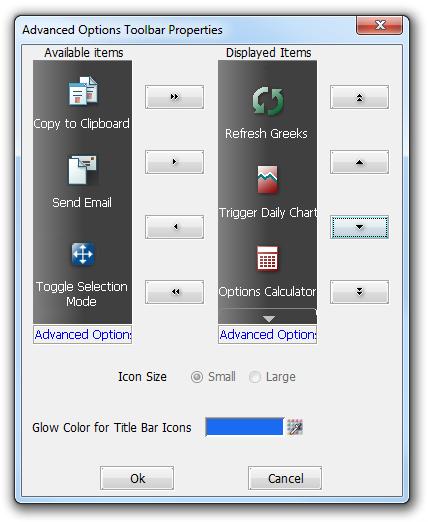
In order to customize the Advanced Options Toolbar you need to right-click on it, select Customize and the Advanced Options Toolbar Properties dialog will be shown. You can also open this dialog if you go to the main menu, select Advanced Options and Customize Toolbar from the bottom of the menu. When your buttons are hidden (as described in the About the Toolbar section) you can also use the last Customize... item from the menu that appears when pressing the The same dialog can be triggered by double-clicking the vertical lines from the beginning of the frame-specific toolbar (please take a look at the image on the right). |

|
|
From the Advanced Options Toolbar Properties you can add, remove and reorder the displayed items on your Advanced Options Toolbar. The Icon Size depends on the size of the buttons used for the main Application Toolbar. In order to read about how to change this size, please click here. You can also change the icons' glow color by pressing the By the Available Items' list right side (containing elements not shown on your toolbar) there are 4 buttons which enable you to:
By the Displayed Items' list right side there are 4 buttons that you can use to move the selected item:
|
|
 button and selecting the color of your choice.
 add selected item (first click once on it to select it)
 remove selected item (first click once on it to select it)
 remove all items
 to top
 one position lower
 to bottom